Category Archives: Photography

Nikkor-H 85mm f/1.8 lens

Maybe the most significant Nikkor ever.


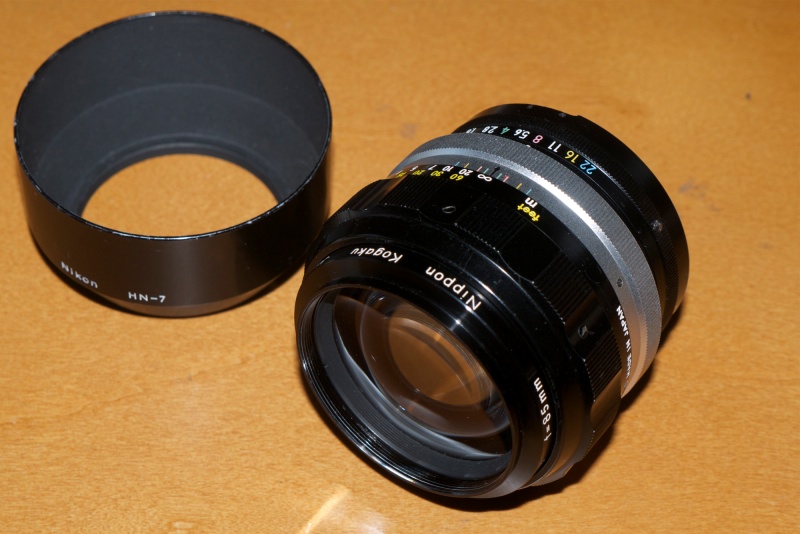
Shown with the period HN-7 screw-in hood.

If ever a lens deserves the appellation ‘famous’, it’s Nikon’s 85mm Nikkor-H f/1.8, first made in 1964. Nikon has made many f/2, f/1.8 and f/1.4 lenses of 85mm focal length since then, and while the current AF-S f/1.4 probably delivers the highest resolution of the lot, few would place the Nikkor-H far behind optically, and only non-users would argue that the current lens is better made. Much as with its contemporaries, the 20/3.5UD, 24/2.8, 28/2, 35/2, 50/1.4, 50/2, 105/2.5 and the 200/4, the construction quality, fit and finish of this lens have not been improved since.

None of the manual focus f/1.8 optics came with the Ai modification which permits mounting on later film cameras and most DSLRs. Nikon made (ugly and no longer available) Ai ‘kits’ which comprise a replacement aperture ring with the wrong surface finish, so if you want an Ai version of this lens you have three choices. Buy one which has already been converted, send it out for machining, or do it yourself. I did it myself and the task is simple. See this piece for details of how to do it yourself.

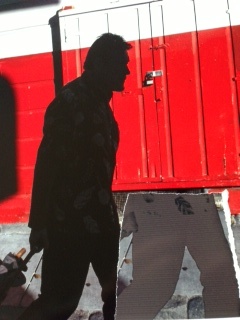
But ‘famous’? Why yes. Because this is the lens David Hemmings used in the studio scenes in Michelangelo Antonioni’s ‘Blow-Up‘ to photograph Veruschka while she writhed below him. His Nikon F with the Nikkor-H mounted can be seen in the contemporary poster.


Fame.

I have long lusted after this optic but good ones go for high prices and cheap ones are usually beaten up, the anodizing on the scalloped metal focus barrel worn away and ugly. Well, I finally snapped one up in near mint condition for $210 delivered, and when it arrived the other day I immediately set to machining the aperture ring to permit mounting of the lens on my D2x and D3x Nikons. I would love to have used it on a Nikon F but no digital version of that classic was ever made, and I no longer use film.

Amazingly, the filter size is the same small 52mm common to most Nikkors of that era and the HN-7 hood screws in. No clip-on nonsense waiting to be knocked off.

Comparison with the AF-D version:

I set to making a quick test using the local back yard utility pole as my test target. My test was against the ‘plastic fantastic’ 85mm f/1.8 AF-D lens, set in the most ghastly plastic mount imaginable, but of outstanding performance. This lens is still available new in the US for $460. How Nikon manage to make a bitingly sharp optic encased in ductile materials and cheese beats me, so I confess that I ran my simple test with some trepidation. Could any lens significantly improve on the AF-D or, for that matter, even match it? My Nikkor-H is positively geriatric, having been made in February, 1969, meaning 44 years ago. It cost me $212.

I should have known better than to worry. Central definition and overall contrast of the old lens easily beat those of the newer one from f/1.8 to f/4, and vignetting is identical, disappearing by f/2.8 in the old, f/3.5 in the new. Edge resolution in the newer lens is superior through f/4 after which they are identical. In a lens of this focal length, the ideal portrait lens on full frame, central resolution is what counts.

The focus throw on this lens is very long – fully half a circle from infinity to 3 feet, making accurate focus on close subjects easy. Depth of field is very limited at wider apertures so a slow focus ring is actually an asset.

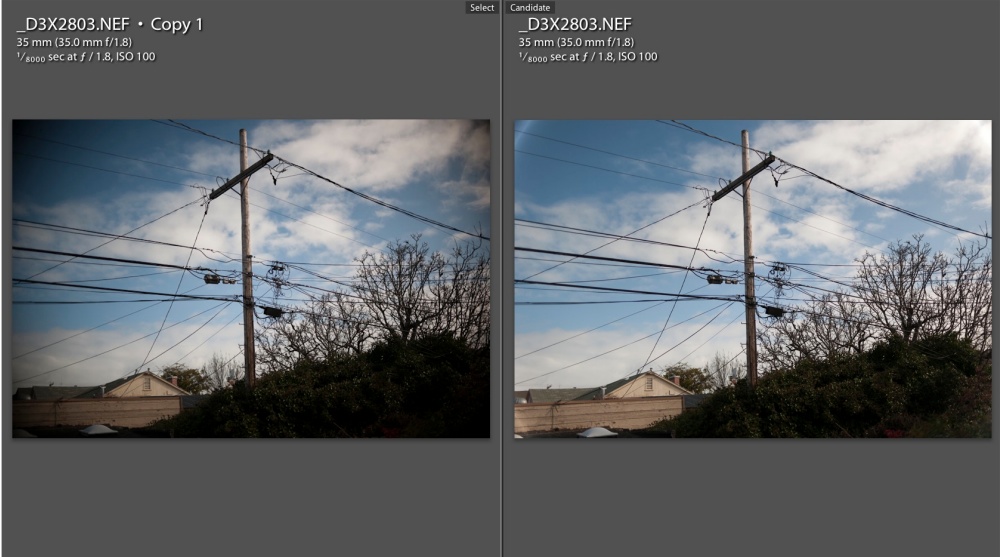
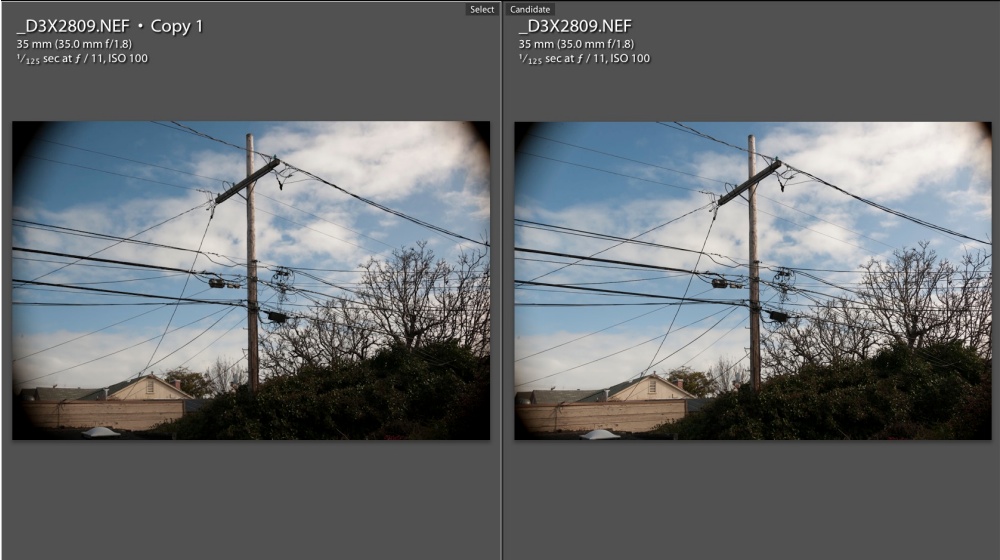
Here’s my thrilling test target, what passes as utility service in the SF Bay area, allegedly part of the most powerful nation on earth. The old MF lens is the left hand image – focal length and maximum aperture are not reported by Lightroom (in the parentheses) as I had yet to install a CPU when this was taken:

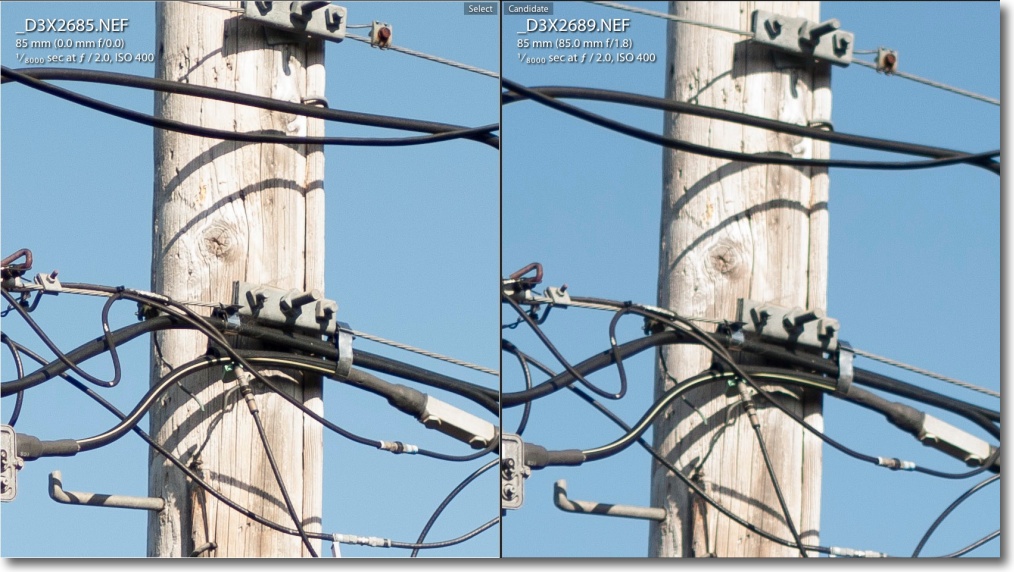
Even viewed via this blog on the 11″ display of my MacBook Air the difference is obvious at f/2, remaining so at f/1.8, f/2.8 and f/4. The enlargement above is from 5 foot 90dpi equivalent print sizes.


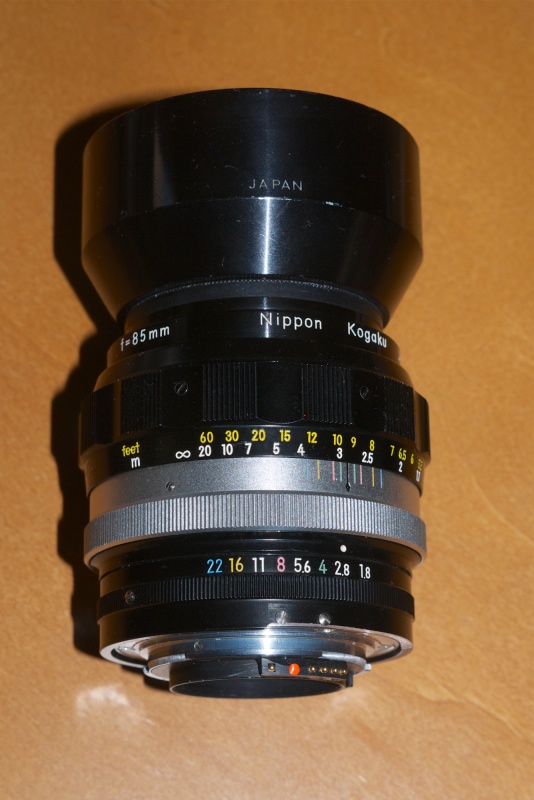
Chipped and ready to go, one of Nikon’s best ever.

The CPU confers a host of benefits, described here and installation on the 85mm f/1.8 Nikkor-H is a simple glue-on job. One key advantage is that you can pass aperture control from the control wheel on the camera’s body to the aperture ring on the lens, sidestepping the non-linearity issue I explain here. Your kit will handle better too, allowing apertures to be changed by supporting the lens properly from below with the left hand. $29 for the CPU, 5 minutes to glue it in place and another 15 minutes to program it, as described here.

Can a lens make a better photographer? When it comes with a heritage like this and when the user revels in the operational feel and the results it yields …. well, you can make your own mind up. Me? I’m going to track down Veruschka’s granddaughter.


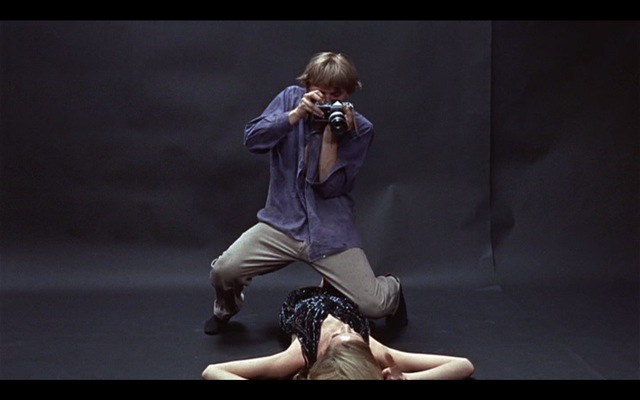
Veruschka writhes as Hemmings snaps.

Lens correction profile:

This lens is so well designed that what optical shortcomings there are – very minor vignetting down to f/3.5 – are easily corrected with my lens correction profile in LR or PS, which you can download here, but of all the pre-Ai MF Nikkors this one arguably needs a profile least. I can detect absolutely no barrel or pincushion distortion. Likewise, chromatic aberration (color fringing) is negligible, though the profile corrects what little there is. My profile was made at f/1.8, f/2.8, f/4 and f/5.6, with the last prevailing at apertures smaller than f/4. It works with both FX (Full Frame) and DX (APS-C) sensors. The profile was made on my D3x but will work on files from any Nikon DSLR.

To get a sense of what this lens can do in the studio, click here. The handling and balance on a modern full size Nikon DSLR are about as close to perfection as these things get. If you can live without AF, search one of these out.

Use on Panny MFT bodies:

A wonderful lens on the Panny G bodies with a $25 adapter, delivering 170mm f/1.8. Very shallow depth of field, and you retain aperture priority automation, the EVF never dims as you stop the lens down (think about that!) and you have a state of the art MF focusing aid which makes dead on focus trivially simple. Read more about the immense capability of the Panny MFT bodies with MF lenses here. As you are really cherry picking the center of the image circle produced by the lens, definition at any aperture all the way to the extreme edges is not an issue.


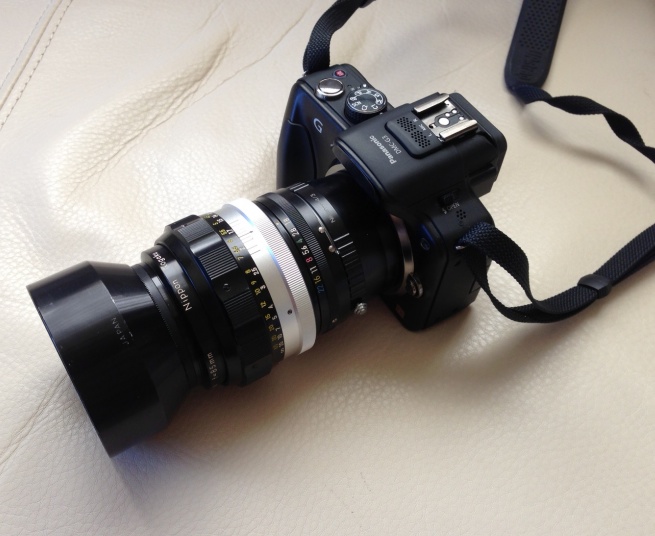
The Hemmimgs lens on the Panny G3.

A 1969 lens on a 2012 body, and fully functional. Pretty cool, huh?

HP DesignJet annual checkup

A little goes a long way.

My HP DesignJet 90, the 18″ carriage model, was commissioned March 14, 2006, so it’s approaching seven years in age. One recent print with a dark black silhouette showed less than perfect blacks and deep, lustrous blacks are one of the many strengths of this excellent printer. Amazingly, B&H still lists the 24″ DJ130 for under $1300 new, and all ink cartridges and printheads remain available on their site, though you may have to hunt about a bit for the special swellable paper which absorbs the ink dyes used by the machine. Regular modern pigment ink papers do not work.

The HP DJ30/90/130 series is blessed with truly outstanding diagnostics and a quick checkout was all it took to find the cause.

First, I dialed up the HP Maintenance Utility which uses online software at HP. For Mac users you have to use OS Snow Leopard or earlier or an even older PPC machine, as HP never updated the software to run on Intel machines. Snow Leopard comes with Rosetta, the PPC emulator software and will run the HP Maintenance Utility fine. Apple recently re-released Snow Leopard on DVD and if you want to run the HP Maintenance Utility on a modern Mac it’s your best choice, though whether it’s even installable on the latest Macs I rather doubt.

I use a decade old iMac which runs Tiger and uses a PPC CPU. Unlike its modern day descendants it does not overheat and refuses to die.

You can run all these print jobs using plain paper in your printer – 8.5″ x 11″. Here’s the Image Quality Diagnostic – this one can unfortunately be run only by using the online software and is the best for determining if a printhead is failing:

No real issues are disclosed here but printhead alignment is called for, judging my some of the colored squares in the center section. The full interpretive section for the above appears here.

Then I ran a printhead alignment which can either be done using the online utility or using the button presses illustrated here:

This did disclose a problem with the black printhead:

The large ‘X’ mark above testifies to a worn or blocked head.

Before deciding on cleaning or replacement of the head I ran the ‘Information Pages’ printout (see above) and got this:

Gaack! The black printhead is 2,534 days old, meaning 6.9 years. It’s the one which came with the printer when I bought it new in 2006! So rather than trying to clean it, I simply replaced it. Pigs get slaughtered.

After replacement of the black printhead – the new one has been on my shelf for ages and is already out of warranty! Some users claim that heads over 30 months old will not work but obviously my experience does not bear this out.

When a printhead is replaced in these machines, they automatically run a printhead alignment which takes some 10 minutes and requires one sheet of plain paper.

Here’s what I got:

All is well.

Finally, out of curiosity, I ran the ‘Paper Usage’ report:

Some advice on older DesignJet printers:

Would I buy one of these used? Only if I could see the Usage Reports and Diagnostics shown above. Many were used by printshops which have beaten the heck out of them. New heads – there are six – run $35 each and cartridges cost a similar amount, so all new heads and supplies total $420. Add $35 for feed tubes. No bargain. Further, if the printer has been unplugged for any period of time, reckon on changing the clogged feed tubes as I had to do when mine went into storage for a few months when I moved a few years back. I explain how to do that here.

Bottom line? I would not pay more than $200-400 for a lightly used HP DJ90/130 (18″/24″) printer, anticipating that some parts will have to be replaced.

Spare parts:

I get mine from Spare Parts Warehouse. The ink feed tube assembly runs $35 and is easy to replace.

Would I buy a new HP printer? Hell NO. I would not buy anything from America’s worst run business whose customer service is a joke. Buy an Epson. The 24″ model runs $3,000 but they will fix it for you when it breaks.

Result:

Success. Perfect blacks were restored.

Here’s the print which was giving me problems:

In the extract, below, you can see a tear sheet of the old print, before the repair, superimposed on the new – night and day:

Printhead failure and analysis:

I have illustrated this before but it bears repeating. Right after the annual checkup, above, the DJ started printing everything with a green cast. This indicates printhead failure as ink levels were fine.

Here is the analysis chart:

I ran the diagnostic report using the online HP utility and this is what I got:


Diagnostic report showing printhead failure.

Comparing with the above chart, you can see that the color patches at A1 (should be magenta), A2 (should be purple) and B2 (should be red) are faulty.

The chart states that A1=M, A2-C+M and B2=Y+M. Note also that the central patch in the left middle section is wrong – it should be magenta. M (magenta) is the common factor to all four error conditions, so I concluded that the Magenta printhead was faulty. $35 to B&H later and it was replaced (a 30 second task) – do insert plain paper when doing this as a printhead alignment chart will be automatically printed when a head is replaced, and the printhead alignment will be performed automatically. It takes some 10 minutes, so be patient. Sure enough, re-running the diagnostic report showed all is well and the DesignJet is back to perfect operating condition.

Are your images being stolen?

It takes a thief to catch a thief.

It seems incongruous that the arch-thief in American commerce, Google, should have crafted a tool which helps photographers seek out illegal use of their images.

It’s called www.images.Google.com and you have two choices to search for your image on the web:

  • Upload a copy of the image to Google
  • Input the URL for the image

Now the first approach has to be lunacy. Like giving a fresh needle and loaded syringe to an addict. So I opted for the second and searched for my wolfhound picture:


Absent a couple of non-commercial Tumblr illict reproductions – hardly of concern – one cropped up where the schmuck who stole my picture was using it to advertise his tweed clothing on eBay.UK (shock news that eBay might actually be involved in providing a conduit for theft).

So I wrote to the son of an unmarried mother in simple terms:

You may wish to use the thieves’ tool to catch thieves yourself.

Follow-up Feb 16, 2013: The thief has now taken my image off his site. May he rot in hell.

Nikkor 35mm f/1.8G AF-S DX lens

Cheep, cheerful, handy.


Mounted on the D2x with the included lens hood.

This ‘plastic fantastic’ APS-C lens sells new for under $200 with a 5 year Nikon USA warranty. Given Nikon’s repair reputation in the US that probably does not mean much but at the price asked with hood, caps and soft case, there’s a lot to like.

I bought it on a whim for those lazy days when I just can’t be bothered to use manual focus, assuming there was little downside.

Nikon wisely deletes the focus and depth-of-field scales from this optic, both utterly useless on modern AF lenses. It also has that handy feature where you can manually override the focus just by grabbing and turning the focus collar, something which is impossible with the previous AF-D series of optics. The included hood clicks on nicely, using a bayonet fit, and the lens accepts standard 52mm filters like most Nikkors ever made before the AF era.

I like this lens a lot. Focus speed is decent if not stellar but the biggest surprise in store is that it is surprisingly useful on full frame.

When images are loaded into LR or PS, the lens’s EXIF file data will invoke the Adobe profile which ships with their applications. That profile was created on an APS-C body and is very useful, taking out minor vignetting and fairly severe barrel distortion, which really has to be removed when snapping architectural subjects.

But you can do much better. Curious to see whether a profile created on an FF body would bring back the heavily vignetted corners, I created a profile using my D3x and Adobe’s Lens Profile Creator software. Because vignetting varies significantly with aperture, I went all in and made this profile at each of f/1.8, f/2, f/2.8, f/4, f/5.6, f/8, f/11, f/16 and f/22! 81 chart shots in all …. You can use this profile with both APS-C and FF files. It does a far better job on the latter than the one Adobe ships.

If you put the profile here on a Mac –

Replace ‘Tigger’ with your user name on a Mac.

– LR and PS will automatically choose it in preference to the stock one provided by Adobe.

The stock Adobe profile resides here on a Mac – there is no need to delete it if adding my profile in the location shown above.

The respective Windows locations are:

Windows 7 or Vista: C:\User\(User Name)\AppData\Roaming\Adobe\CameraRaw\LensProfiles\1.0

Windows XP: C:\Documents and Settings\(User Name)\Application Data\Adobe\CameraRaw\LensProfiles\1.0

You can find my enhanced profile here. On FF, extreme edge definition is excellent from f/4 through f/11. There’s a lot more to this self-effacing lens than meets the eye.

Here are before and after images on full frame where the lens really is 35mm focal length – ideal for street snapping, no sensor crop involved.. The first pair at f/1.8, the second at f/11. In each case the right-hand image is after applying my profile:


In the snaps below I used my lens profile with the APS-C sensor in the D2x.


Walking the pup. D2x, f/2.8.


San Mateo Post Office. In its usual schlocky under-capitalized way, this failing
business is letting a landmark heritage building rot into oblivion. D2x, f/2.8.


Bits missing and waiting to rot. D2x, f/2.8.


Inside the St. Matthew station USPO. No corner shading whatsoever using my profile. D2x, f/1.8.


Magnificent period detail. D2x, f/4.

Any Nikon APS-C body – such as the D1 and D2 series, the D70, D90, D100, D200, D300, the D7000 or even later bodies – constrained by a lower quality, slow kit zoom lens would benefit from this inexpensive optic. It has excellent resolution and can continue being used with few excuses once the user upgrades to an FF body, provided you also use my profile, above. Further, the discipline imposed by a fixed focal length lens, dictating proper composition before the button is pressed, can only enhance the snapper’s skill set and improve the results. Finally, it’s nice not to have to remember to limit this lens to APS-C bodies only if you use both APS-C and FF.

Some Nikons – the D3 series and the D4 – offer an optional 5:4 aspect ratio frame (too square for my taste) which crops vertical strips either side of the full frame. This format should have no issues with across the frame resolution using this 35mm lens.

Pixel peeping fallacies

Know what you are looking at.

When I migrated from the 12mp Nikon D700 to the 24mp D3x, I did a bunch of thinking about the justification for more pixels.

If you do not propose increasing your print size or cropping more severely, more pixels will likely not serve you well. I contemplate making both larger prints and cropping more when needed. Thus, the higher pixel count sensor makes sense for my contemplated needs.

When I first uploaded D3x images from the D3x to Lightroom, I naturally previewed images at 1:1 and remember thinking “What’s the big deal? This does not look any better than the files from my D700 at 1:1.”

The problem, of course, is that I was not comparing like with like.

Here’s a simple table to illustrate the issue.

I have compiled data for four common Nikon sensors – the math is brand-independent, it’s just that I know these bodies and have RAW images from all. I enlarged these original images using the 1:1 preview function in LR4 and measured the image width on my 21″ Dell 2209WA (1650 x 1080) display. So in the table above, using the D2x as an example, the 12.2MP sensor delivers an image which, if printed 1:1, would be 47″ wide.

What does Adobe’s Lightroom mean by 1:1? It means that images displayed 1:1 are displayed at 90 pixels/inch – you can confirm this by dividing the ‘Sensor – W’, the pixel count across the width of the sensor, by the ‘Width at 1:1 in inches’ and in each case you will get 90 dots per inch. That’s good for an LCD display or for prints looked at from a reasonable distance. If you want to stick your nose in the print, then you want to limit the pixel density to 240 pixels/inch, which is the same as dividing the above ‘Width at 1:1 in inches’ data by 2.7. So a 240 pixels/inch print from the D800’s sensor, for example, would be 31″ wide (83/2.7). But in practice, you do not need that high a density in huge prints.

As you can see, comparing a D700 image with, say, a D800 image, is not fair if identical 1:1 preview ratios are used. You are comparing a 46″ wide image with one almost twice as large at 83″. To make the sensor comparison fair, you need to preview the D800 image not at 1:1 but at 1:2. That will yield approximately the same reproduced image size, making for an objective comparison of resolution and noise if the same lens and technique are used for both.


Preview options in Lightroom.

Yet, I suspect, many snappers fall afoul of these erroneous 1:1 comparisons concluding:

  • I need better lenses with the newer body
  • My images are blurred, I need to use faster shutter speeds
  • My focus is out, there’s something wrong with the camera

All of the above lead to much time and money wasted in fixing the unfixable. Bad data.

It is indeed quite likely that your new sensor out-resolves the limits of your older lenses at 1:1. It’s also reasonable to expect motion blur to be more visible at the same shutter speeds if you use faulty comparisons. And the chances are it’s your technique not your hardware which accounts for poor focusing, the errors only becoming visible at double your former preview magnifications. But, unless you contemplate making crops to one quarter of the area of your previous sensors or making prints 7 feet wide instead of 4 feet wide, your sensor upgrade is only causing you needless pain.

My first conclusion with the D3x compared to its D700 predecessor was all of the above, until I figured out what I was looking at. Some comparisons are easily drawn. It’s clear for example, that the D700 has lower noise than the D2x for the same image size, hardly surprising as we are comparing a recent FF sensor with an older APS-C (D2x) one. The total pixels and 1:1 print sizes are almost identical. On the other hand, comparing the D700 at 1:1 with the D800 at 1:2, for like print sizes, shows little difference. It’s only when you double preview sizes with the D700 to 2:1 and the D800 to 1:1 that you see the greatly superior resolving power of the D800, as the number of pixels you are looking at in such a comparison is tripled in the case of the newer sensor.

Nikon has not helped the situation. After their affordable high pixel count FF bodies – the D600 and D800 – came to market, they started publishing pieces intimating that only their very costliest and newest lenses were ‘good enough’ to extract the best from the new sensors. The rest of the sheep writing purportedly critical analysis followed right along. It’s called sales and makes little sense. Some of Nikon’s highest resolving power lenses were made ages ago, long before digital sensors existed – any Micro-Nikkor macro lens pretty much qualifies (55, 105 and 200mm) – as do a host of pre-Ai lenses, many over four decades old. If you like the latest and greatest (and costliest) have at it. But don’t believe everything you read from such conflicted sources. Their primary focus is not on your image making capabilities but on your wallet, be it through sales (Nikon) or click-throughs (the whores who parrot this stuff as if it was technically proved fact).

So before you chuck out your old lenses and start buying costly superspeed exotics which allow the use of faster shutter speeds, while contemplating return of the body to Nikon for repair of focusing errors, ask yourself what you are really looking at when you preview those enlarged images on your display.

Practical implications: It’s not like you can avoid buying new gear with lots of megapixels by trying to save money on something with fewer. Everything has lots of pixels today. 12MP is hard to find at the lower limit. But the practical implication of this rapid technological advance is that, for those on a budget, substantial savings can result from buying the previous generation of hardware, comfortable in the knowledge that while 8-12MP may not be a lot, it’s more than enough for 99% of needs. DSLR bodies like the Canon 5D, Canon 5D MkII, Nikon D700, Nikon D2x, Nikon D3 and others no less capable from Pentax and Sony offer tremendous savings just because they have been replaced with something that measures better in a comparison table. Heck, a lightly used 6mp Nikon D1x can be had for under $250 and will offer tremendous capability, outfitted with a $50 mint MF Nikkor, far in excess of the abilities of most. The barrier to entry to good hardware has never been lower. 16″ x 20″ prints? No problem. Why do I say that? The D1x’s sensor is 3,008 pixels wide, so for a 90 pixel/inch print (what Lightroom shows at 1:1 preview) you would get a print sized 33″ x 22″. Unless you stick your nose in it, it will show just fine.


Nikon D1x. Add Nikkor of choice.