Category Archives: Hardware

Stuff

Adding a Fusion Drive to the Mac Pro – Part XXXI

A neat technology which preserves the Recovery Partition

For an index of all my Mac Pro articles, click here.

If you are looking for the highest disk speeds in OS X then the way to go is either:

  • A Samsung/Apple blade SSD in a PCIe slot – $800/TB with a limit of 1TB per PCIe slot. 1400MB/s.
  • Two 2.5″ SSDs on an Apricorn Duo card, RAID0, in a single PCIe slot – $400/TB with a limit of 2TB per PCIe slot. 650MB/s.
  • The Addonics mSATA card, RAID0, in a single PCIe slot – $400/TB with a limit of 4TB per PCIe slot. 700MB/s

I favor the last solution because of the maximum potential capacity, and to further speed things up from the stock 450MB/s I pair the SSDs on the Addonics in RAID0 using Disk Utility, which doubles the capacity (2 x 256GB SSDs become one 512GB drive with a 56% speed gain to 700MB/s).

But there is one snag with using RAID0 and it is that you lose Apple’s invaluable Recovery Partition technology.

Apple states the benefits of a Recovery partition are (my emphasis – that’s the option I really want):

  • OS X Recovery includes a built in set of utilities as part of the Recovery System. You can use OS X Recovery to do the following:
    • Restore your Mac from a Time Machine backup.
    • Verify and repair connected drives using Disk Utility.
    • Check your Internet connection or get help online using Safari.
    • Install or reinstall OS X.

The complete Apple advisory is here.

Think of the Recovery Partition as the last resort when all else is lost and as one more invisible sentinel looking out for your interests.

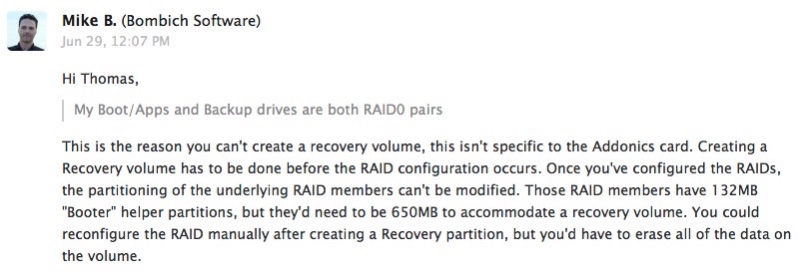
I contacted Mike Bombich, the estimable author of CarbonCopyCloner – who else on earth could know more about this sort of thing? – and got the following explanation as to why I could not see a Recovery partition on my RAID0 paired mSATA SSDs:

Mike references this article on setting up of Fusion drives with two disks after the Recovery partition has been established. Adopting a Fusion Drive solution sidesteps the disappearance of the Recovery Partition in RAID0, albeit at the sacrifice of some speed. Read on.

You can create a Fusion Drive from any two internal disks; Apple cautions against doing this with external drives. Apple uses a largish SSD (larger than that found in hybrid drives) and a big HDD. I’m using two SSDs which act as my daily OS/Apps backup and that is where the Recovery Partition will be created before the rest of the drive pair is recreated as a single Fusion Drive. The Recovery Partition is invisible to Finder but can be seen as a boot drive if you do a Cmd-R or Option-boot start of your Mac Pro. The linked Apple document, above, tells you which version of OS X is required.

Set forth below – long and geeky – is the process of combining two mSATA SSDs mounted on the Addonics PCIe card into one Fusion Drive with a Recovery Partition. Without Mike Bombich’s help none of what follows could have been done.

Step 1 – Prepare two of the drives on the Addonics:

Format each drive in Disk Utility as OS X (journaled) – that’s 2 x 256GB drives in my case.

Step 2 – Install OS X on one of those two drives:

You cannot create a Recovery Partition on the drive until OS X is installed.

Step 3 – Create the Recovery partition on the OS X drive:

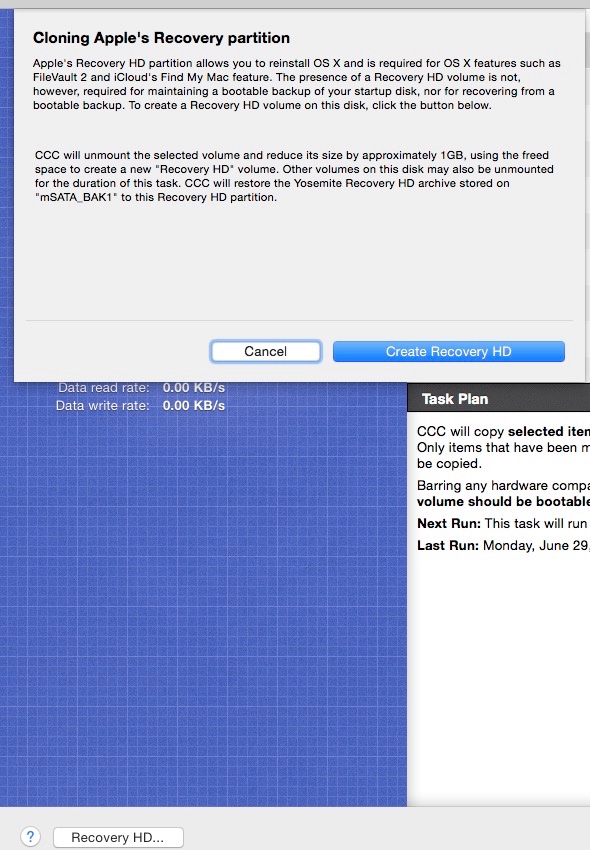
You use CarbonCopyCloner to do that; it create an invisible partition in Yosemite some 790MB in size in Yosemite.

Step 4 – Note the file names:

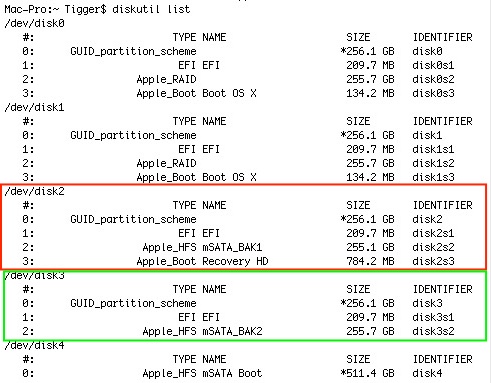
Go into Applications->Utilities->Terminal and note the drive names:

The SSD with OS X and the Recovery Partition is shown in the red rectangle (‘mSATA_BAK1’). One partition on that drive will become part of the Fusion Drive. The one in green is the second SSD, all of which will become part of the Fusion Drive (‘mSATA_BAK2’). Fusion Drive component drives do not need to be like sized to avoid space wastage, unlike with RAID0 where the size of the smallest drive dictates total space.

Step 5 – Create the Fusion Drive:

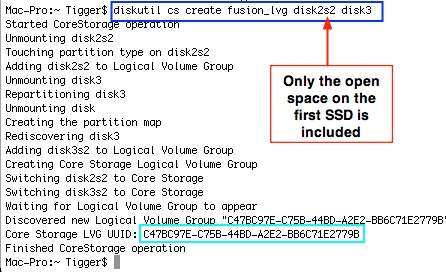
This process concatenates (strings together in sequential order) the two large open spaces on the two mSATA SSDs. It’s key to follow the instruction set in Terminal below (blue rectangle) – we are concatenating only the open partition of the first SSD (red, above) with the whole of the second drive (green above). The blue rectangle below is all you type, then hit enter. If you simply combine both drives the Recovery Partition will be erased (‘disk2 disk3’ instead of ‘disk2s disk3’):

Do NOT exit Terminal. You need that cryptic drive ID (cyan rectangle) in the following instruction.

Step 6 – Create the Fusion Drive volume:

Type the instruction in the cyan box and hit enter; it’s best to copy (Cmd-C) and paste (Cmd-V) the UUID to avoid typos. Hit enter:

Step 7 – Check in Drive Utility:

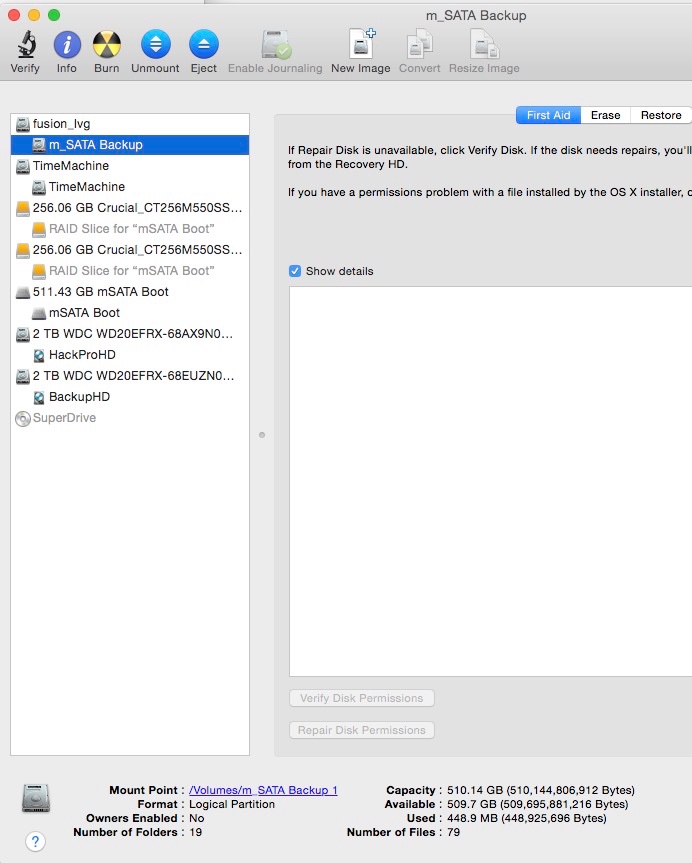
Go into Drive Utility and you will see:

In the above I have renamed the Fusion Drive to ‘m_SATA Backup’ for clarity.

Step 8 – Check on the Recovery Partition:

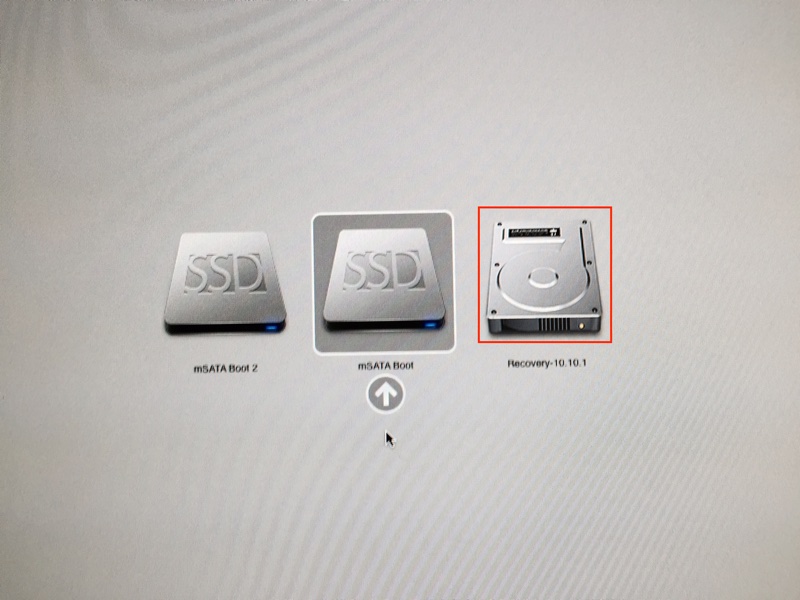
Restart while holding down the option key. You should see the Recovery ‘disk’. Click on that and you will enter OS X Disk Recovery Utilities which offer all the disaster recovery choices shown in the introduction to this article:

Step 9 – Add a nice icon:

My Desktop looks like this – before doing a full clone of the boot to the backup drive:

  • mSata Boot is a RAID0 pair of mSATA SSDs on the Addonics PCIe
  • HacProHD and BackupHD are two large WD 2TB Red spinning HDDs for data and data backup, respectively
  • TimeMachine is the (restorable) 3TB WD Red HDD with sequential backups
  • mSATA Backup is the Fusion Drive with the Recovery Partition created in this article.

Step 10 – Backup:

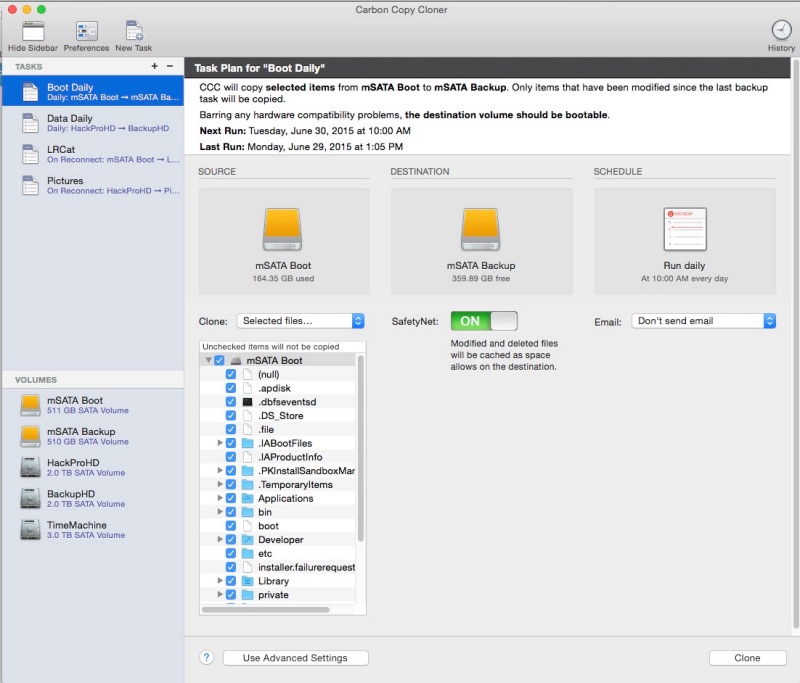
Boot into your usual boot drive and back it up using CarbonCopyCloner to the Fusion drive.

You are done.

Speed tests:

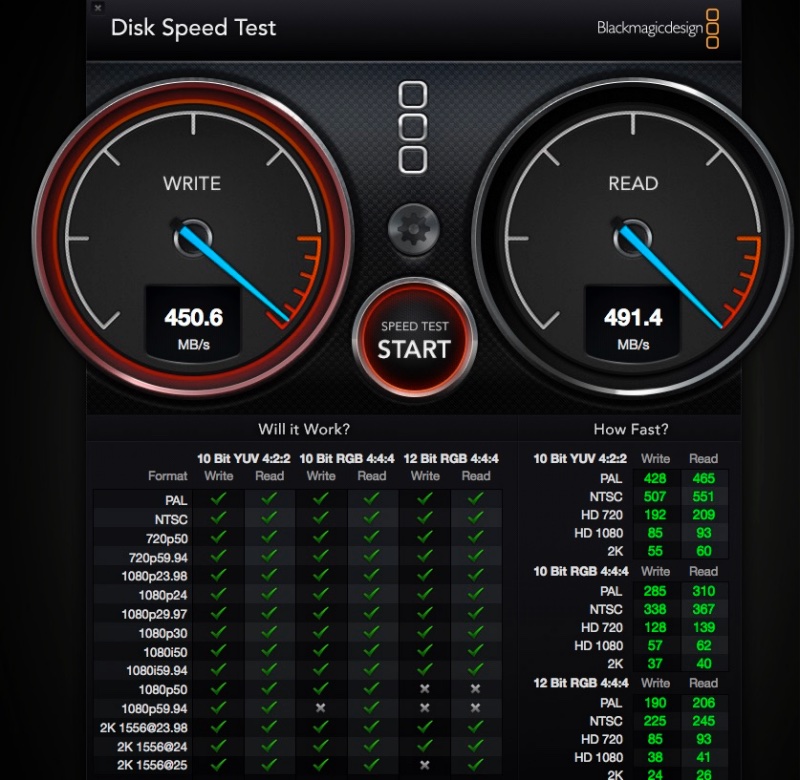
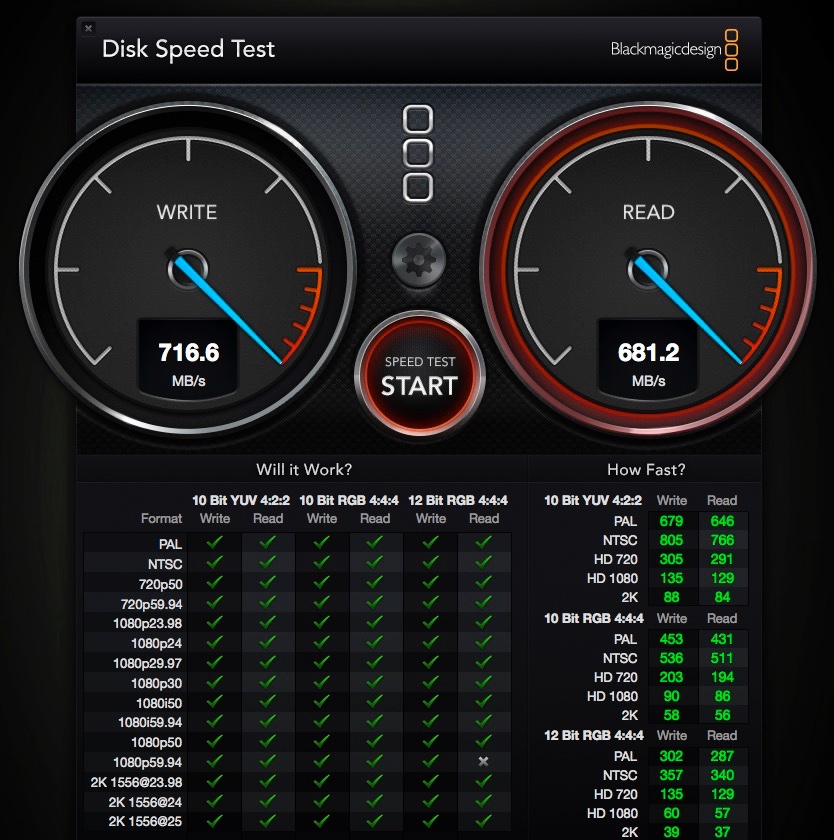
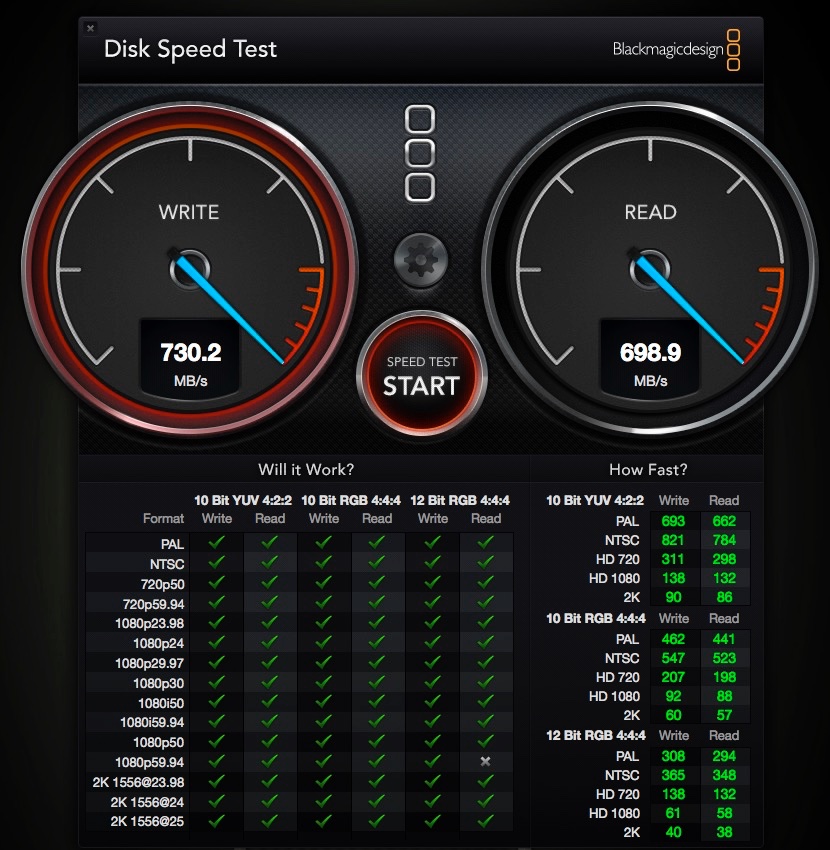
The Fusion Drive is a concatenation of two drives – they are strung end-to-end. This is unlike a RAID0 array where the two drives are written to in parallel – simultaneously – which results in far higher drive speeds than with concatenation. As speed is not of the essence in a backup drive, the lower performance is no big deal – compare to the 700MB/s I get with the RAID0 pair:


Speed of a dual SSD Fusion Drive.

The GTX980 GPU for the Mac Pro – Part XXX

An extraordinary piece of engineering.

For an index of all my Mac Pro articles, click here.

Upgrading from the GTX680:

This writer, a graduate mechanical engineer, has one extraordinarily sensitive device built into his constitution, one missing from liberal arts graduates. It’s a BS Meter and when I saw this on the box of the EVGA GTX980 my BS Meter went off the scale:
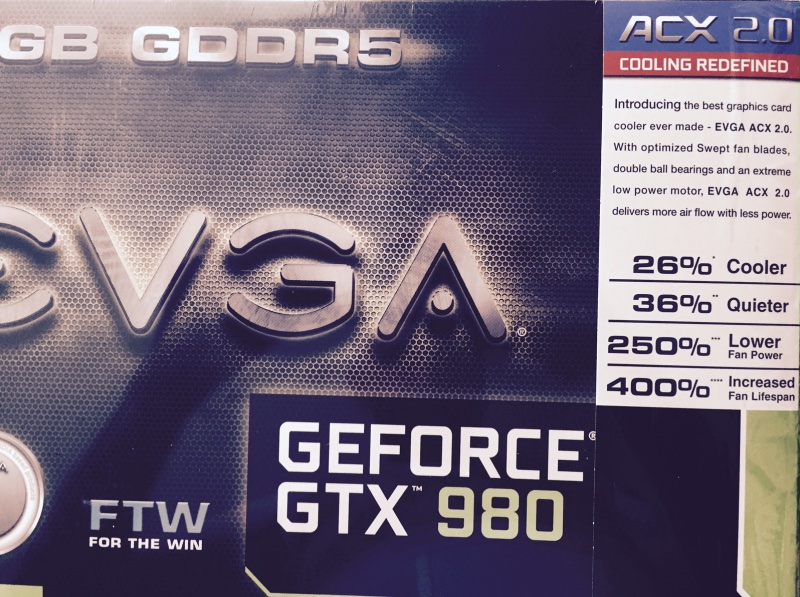

And you thought only Apple did this sort of thing?

But while I cannot attest to the percentages nor see how on earth any of this BS can be tested and proved, read on and you will agree that the GTX980 is an extraordinary engineering accomplishment.

When I wrote about the Nvidia GTX680 graphics card for the Mac Pro 18 months ago it was the fastest card out there and ran natively with drivers provided by Apple with Mac OS X. The reason no separate drivers were needed is that Apple had offered the GTX680 in a ‘Made for Mac’ edition which showed the full boot screen at start and, accordingly, was obliged to include the drivers to maintain the ‘Apple supported’ story. Maximum power draw is 195 watts.

Driven to ever greater performance by computer users who devote what few brain cells they have to gaming, Nvidia rolled out the GTX780 card a while back but that was a poor choice for the Mac Pro user as at full power draw it needed 250 watts against the maximum spec of 225 watts stated by Apple for aggregate current draw from the PCI slot (75 watts) plus 2 x 75 watts from each of the PCIe boost sockets on the Mac Pro’s backplane board. Sure, 25 watts was not exactly much of an overdraw, but why tempt providence, backplane boards with fried traces costing some $450 + labor to replace.

Then Nvidia recently announced a technical tour de force, the GTX980 which claims to draw just 165 watts at maximum draw, or 15% less than the GTX680 while simultaneously offering much better performance and running much more quietly. While my measurements suggest the power savings are ever so slightly overstated, the performance boost and noise reduction are remarkable. Working video pros can benefit from upgrading to this card thanks to the brain dead gamers who pushed its development.

The reduction in fan noise in the GTX980 compared with the GTX680 is not simply attributable to a cooler running card, meaning lower fan speeds. In the case of the EVGA case design (I cannot speak for others like Gigabyte, PNY, Zotac, etc. not having tried them) attention has been paid to the design of the fan blades to provide quieter running. Recall how Apple made a big deal of this in their rollout of the cylindrical Mac Pro? Apple has long majored in claiming credit for invention of what are existing, decade old technologies and this was one of the more irritating examples. Remember the vaunted ‘Superdrive’? A dirt cheap Hitachi or LG CD/DVD reader-burner with the escutcheon removed (a 5 second job). Or the banishment of ‘vampire draw’ from its battery chargers? Please. Or want to go back to the early days of the Mac with its graphical interface and mouse? All stolen from Xerox.

GTX980 cards which come with two dual-link DVI sockets:

In my piece on the Apple 30″ Cinema Display I mentioned that there are at least five variants of the GTX980 which provide the optimum connections for two of the big dual-link DVI Apple Cinema Displays (and similar Dell, etc. 2560 x 1600 displays) without having to use the unreliable Dell powered Dual-link DVI -> MDP adapter. (Apple makes a dual-DVI to MDP adapter with an equally poor reputation).

That GPU information is repeated here:

All other versions I have examined from many makers offer just one dual-link DVI socket along with various mixes of HDMI, DP and MDP.

Having had nothing but great experiences with EVGA products in the past, I bought the EVGA P/N 04G-P4-2986-KR for $530 + tax:
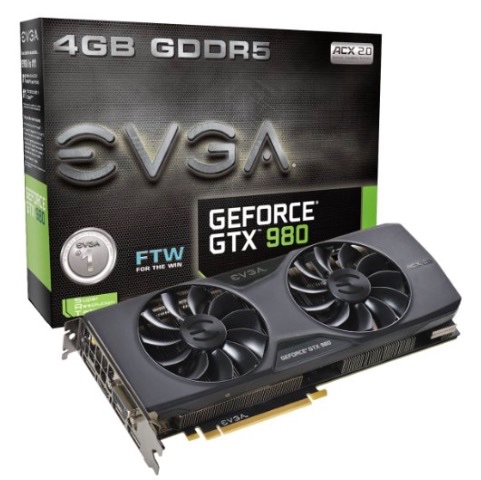

The EVGA GTX980 model P/N 04G-P4-2986-KR.
Amazon’s illustration wrongly shows one DVI socket.

This comes with one DVI-D and one DVI-I socket (both dual-link), one DP and one HDMI, regardless of what Amazon’s confused listing states.

Preliminaries:

Before rushing out and upgrading to a GTX980, a couple of preliminaries:

  • You will need one 6 pin to 8 pin mini-PCIe power adapter cable (not two, which I bought, owing to errors on Nvidia’s web site), in addition to two standard 6-pin cables for the model I bought.
  • The card is long (no problem) and wide, the latter making fitting anything in PCIe slot two challenging, but possible.
  • Mine had one loose alloy cooling fin rattling around in the casing when received, even though the card was shrink wrapped. I dismantled the card, removed the errant cooling fin – one of dozens so no material effect on cooling – and all was well. You may be lucky. If your mechanical skills are limited and you get one like mine, be prepared for return and exchange delays.
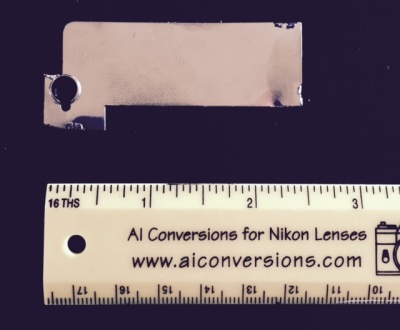

    Loose end cooling fin extricated by the writer.

  • You cannot use the stock drivers Apple ships with OS X, and must download the Nvidia drivers. The Mac Pro will not boot with the stock OS X drivers.

Here’s how it compares with my GTX680:


GTX680 top, GTX980 below.

The PCI connector for the GTX680 still has its rubber protector in place. 10.7″ vs. 10″ in length, no fit issues, but remember to retract the (grey) PCIe fan when removing and refitting to properly engage the base ‘claw’ at the bottom rear of the card, visible on the GTX680 above. The GTX980 has a like claw, hidden in the image by the shipping protector.

Here’s the 6-pin to 8-pin adapter cable:
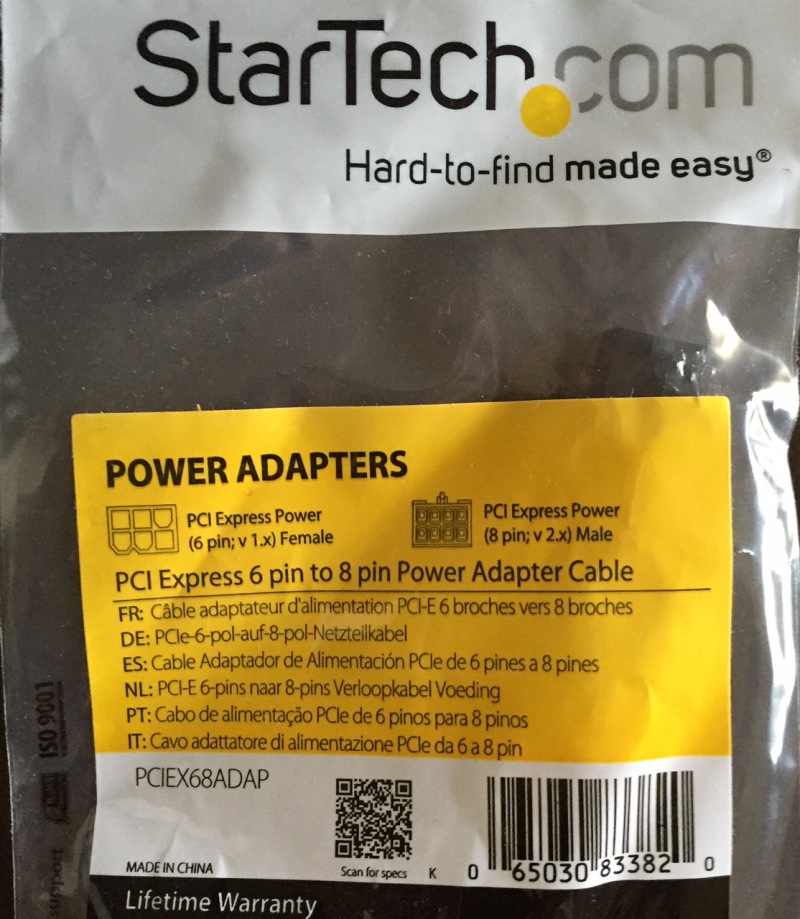
And here is the card installed in my Mac Pro:
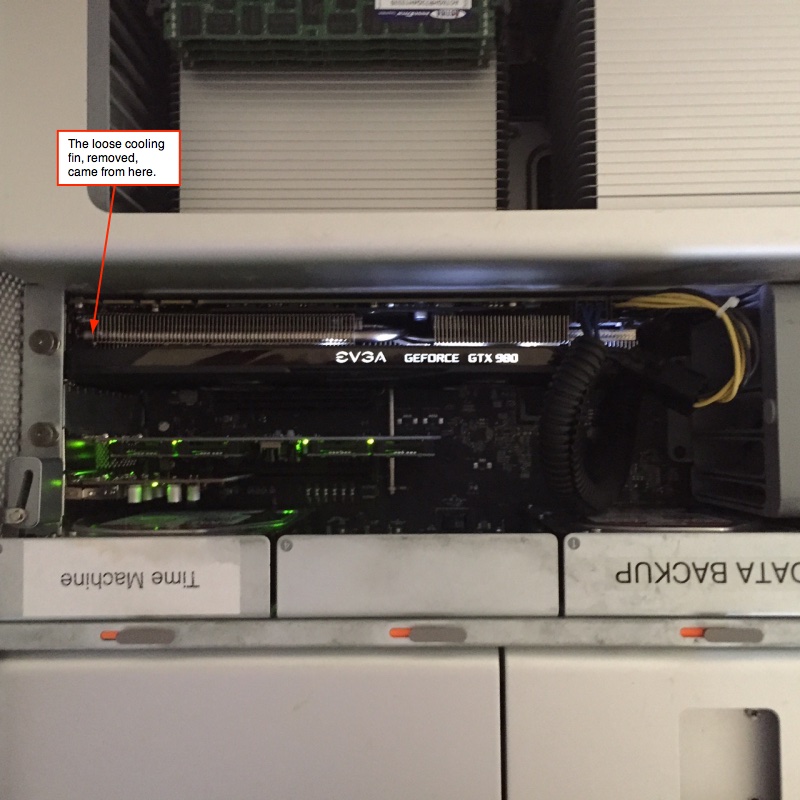

Illuminated script, no less! The green diodes are on the Addonics mSATA boot drive.

To make sure you have properly installed Nvidia’s drivers, check System Preferences->NVIDIA Driver Manager, which must appear thus before you install the GTX980:
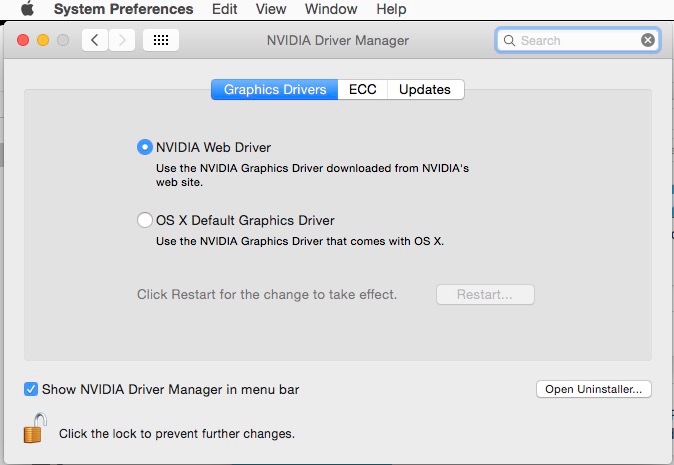

Nvidia drivers installed and activated.

You must have current Nvidia drivers for this card to work:

Nvidia has been doing an excellent job of updating its drivers as Apple endlessly and unnecessarily futzes with OS X changes, but what this means in practice is that as every OS X change upgrade breaks the Nvidia driver, so you must not upgrade your OS X installation until Nvidia has announced the related upgraded driver, or it’s a black screen for you. Irritating as all heck, and typical Apple maliciousness and small mindedness as they continue favoring ATI for GPU chips in their machines.

Start up your GTX980 with OS X drivers installed in lieu of the required Nvidia drivers and, in my case, you get a lot of screen flashing, a jerky cursor, a slow boot cycle if it boots at all (a ‘grey screen of death’ is not uncommon – I got it) and no selection of display definitions in Sys Prefs->Displays->Scaled. I could only get 2560 x 1600 on my 30″ ACD whereas I like to use 2048 x 1280. A curse on Apple for not including the enhanced drivers with OS X. How small minded is that? Am I likely to rush out and buy a dustbin Mac Pro just because they are adopting the petulant behavior of their founder? Especially when the nMP cannot hold a candle to the cMP?

Be aware that if you do a PRAM reset OS X will revert to using the stock OS X drivers, meaning a very unresponsive cursor and display in my case. Go into the Nvidia menu Bar icon, switch to Nvidia drivers, reboot and all is well. If you can’t even get the display working, keep and old GT120 card around (see the end of this article) install it and connect your display to it while you elect the Nvidia drivers. A real pain.

With that out of the way, you still get no boot screen, and the nice people at MacVidCards – real experts at this sort of thing – can upgrade your card to show that screen for $180. They have an excellent reputation in the industry. Those unfortunates who use Windows can DIY, but Windows is a strict no-no chez Pindelski and I prefer to trust my costly card to a professional rather than turning it into a brick.
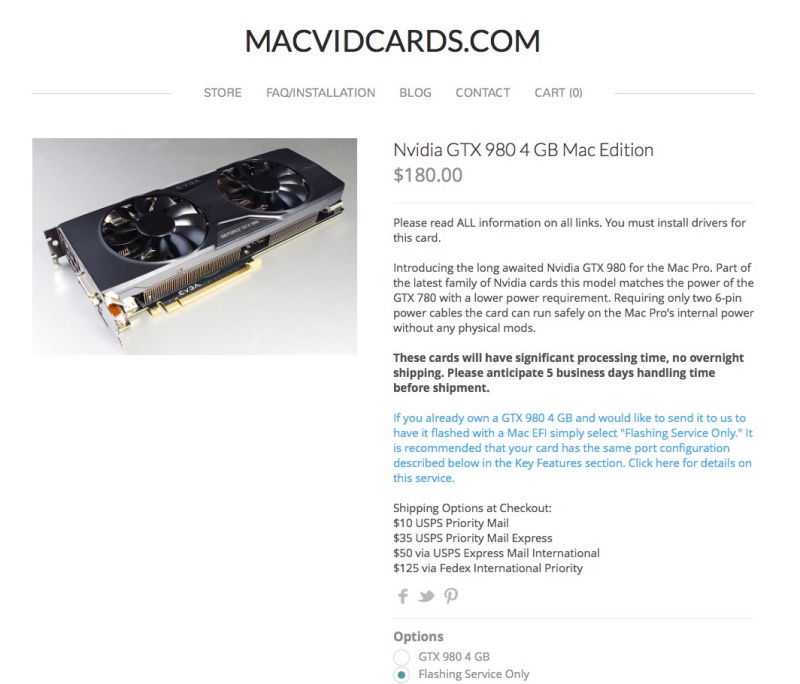

Click the image for the MacVidCards site.

Mine is off to MVC. I have no financial interest in their business.

After installation, all is sweetness and light with the Nvidia drivers in place:
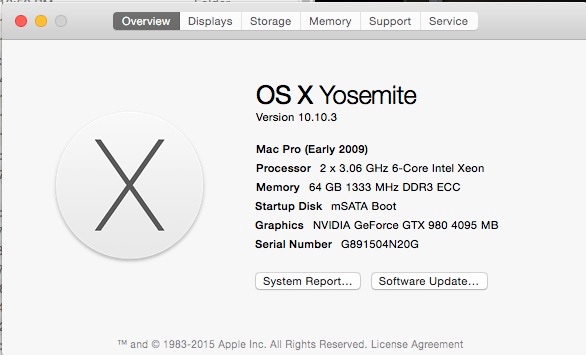
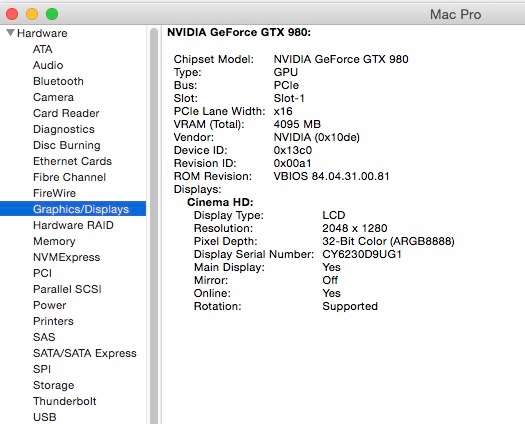
The card is properly recognized and memory is 4GB compared with 2GB for the GTX680:
Comparison with dual D700s in the new Mac Pro:

Let’s cut to the chase. Here’s Unigine Heaven running on a 1680 x 1050 display in the new Mac Pro using the top-of-the-line dual ATI Radeon D700 GPUs (dual GPUs being one of Apple’s quite especially dumb moves in recent years when hardly no software uses them); my Mac Pro is on the right:
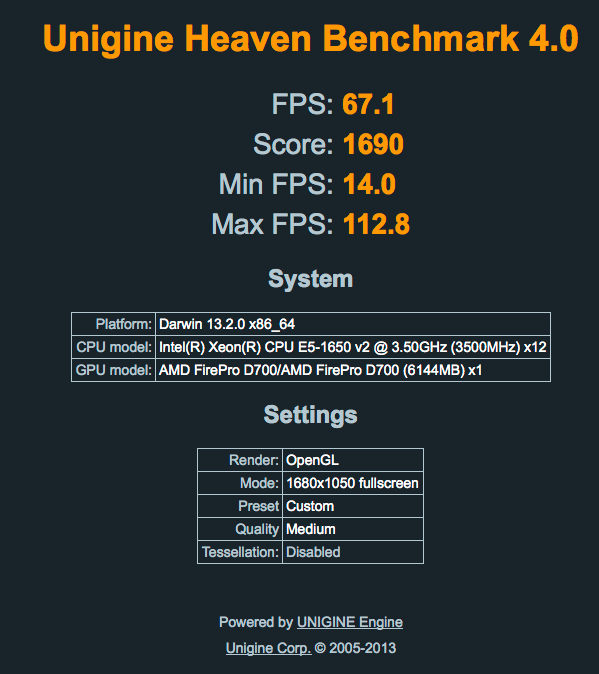
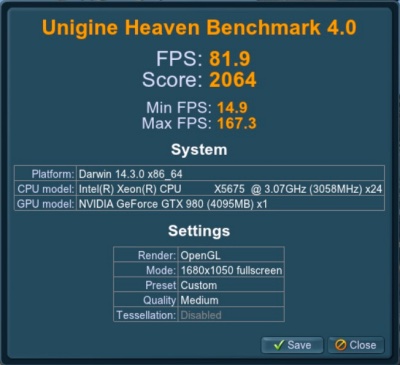
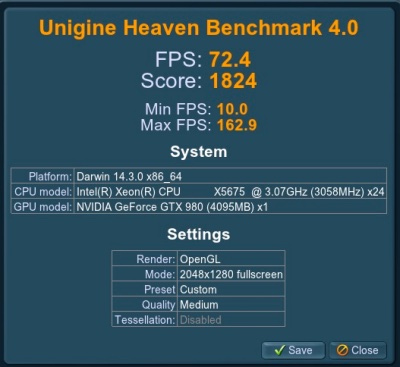
The GTX980 is 22% faster than the very costly dual D700s in the new Mac Pro.The D700s command a $600 premium over the stock D300s (specified at purchase only) whereas the upgrade from a used GTX680 to a new GTX980 runs $300 (can be done at any time).

As for noise, the fan in my EVGA GTX680 is loud – if not roaring – when the stressful Unigine Heaven test is run, whereas in the GTX980 it is silent. Impressive.

Performance at different screen resolutions in the Mac Pro:
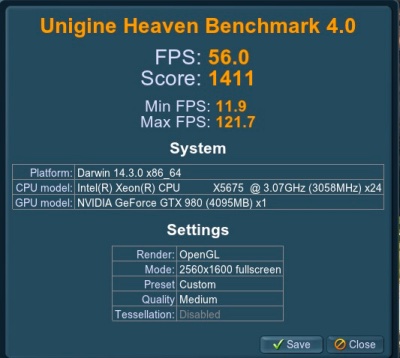
2560×1600 compared with 2048×1280 Unigine Heaven results.

Performance holds up well at 2560 x 1600 (the highest resolution available in the 30″ Apple Cinema Display) as well as at 2048 x 1280 which my eyes favor.

At the commonly used 1920 x 1200 the result is as follows – quite extraordinary:
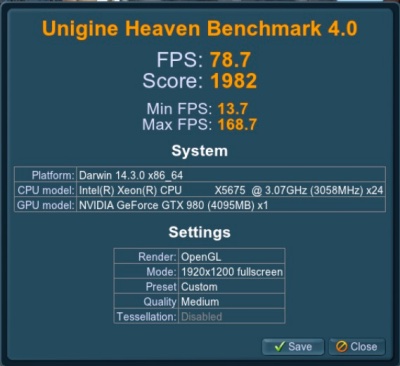

Unigine Heaven at 1920×1200.

All excellent statistics, especially in view of the card’s quiet running.

Power consumption:

I was unable to quite replicate the claimed 15% drop in power use with the GTX980 compared with the GTX680, but the good news is that total power use is well within the capabilities of the Mac Pro’s massive 980 watt power supply.

In this image you see the current draw of the GTX980 in the left column at 1680×1050, and at 2560×1600 on the right; the three measurements in each column are for the PCI slot, and for each of the mini-PCI booster sockets – recall each of these three sources is individually limited to 75 watts (6.25 amps), and all are in compliance:
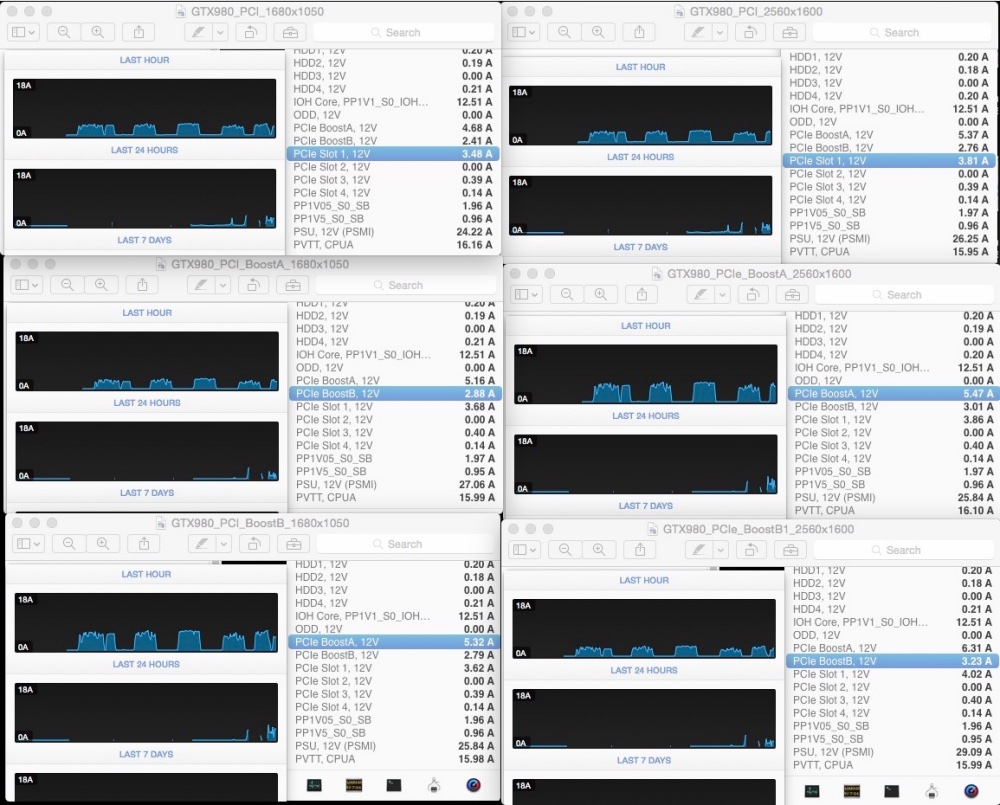
These data compute to power use of 140 watts at 1680 x 1050 and 150 watts at 2560 x 1600, all well within spec, and all measured with Unigine Heaven running at full bore – a very stressful test. When I tested the GTX680 the 1680 x 1050 test required power of 157 watts, so the GTX980 saves 11%, close to the 15% claimed, if not matching the marketing. Still, that is very impressive, and like percentage savings accrue at higher screen resolutions.

LuxMark data:

The jump in performance with LuxMark is extraordinary – this is a test which requires a complex scene to be rendered:
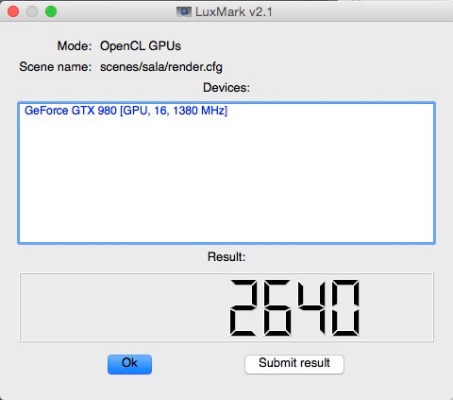
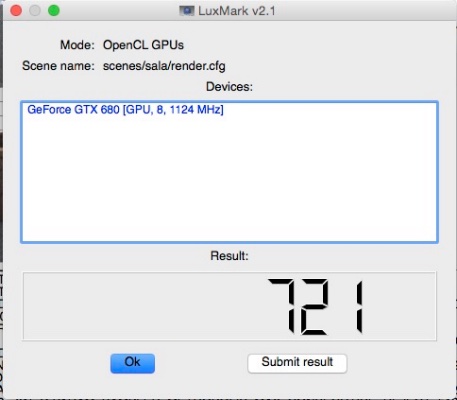
Luxmark for the GTX980 compared with the GTX680.

The gain in performance is no less than 266% (“more than 3x as fast” would be Apple’s breathless marketing prose), suggesting that video producers doing complex rendering in apps which make good use of the GPU should upgrade to the GTX980 immediately. Time is money and renders take time.

Heat:

None of my measurement apps accesses thermal sensors in the GTX980 but at least one statistic is of note. At idle, the PCI fan in my Mac Pro (the large grey fan mounted on the backplane board) ran at an elevated 1425rpm, whereas with the GTX980 installed it idles at the stock 800rpm. That can only be good news and the combination of the new chip architecture along with two fans (my GTX680 has one) does the trick.

4K displays:

I continue to defer upgrading to 4K as standards are, well, anything but standard, with much confusion about 30Hz vs 60Hz, boot screens or no boot screens, SST vs. MST, Windows compatibility (like I care), and on and on. But the 4K display user should benefit significantly from the added performance offered by the GTX980 provided he can get 60Hz refresh rates in OS X.

Who should upgrade?

Heavy video renders using CUDA? Upgrade right away if your app uses the GPU well and is CUDA dependent. The gains are easy to see and the price is under $600 with your old GTX680 selling for $300, so $300 out of pocket. A few hours work will see your cost recovered in faster render times. Popular CUDA apps include many in the Adobe CC suite (AfterEffects, Photoshop, Premiere Pro), FinalCut Pro, Maya, Avid Motion Graphics and Media Composer, DaVinci Resolve, Cinema 4D and Redcine-X.

Lightroom users? Meh. The GTX680 was already immensely capable, and while the GTX980 allows me to page through full size previews at blitzkrieg speeds and I never see any wait delays for rendering, it’s overkill. The same applies to Photoshop.

The GTX980 is a remarkable engineering accomplishment and, if you must know, Nvidia somehow manages to get over 5 billion transistors on the die which makes a top-end Intel CPU look about as crowded as Iowa.

Update June 26, 2015:

I sent the card off to MacVidCards to have the ROM modified to display the boot screen and the Option-Start boot drive selection. The card was back in my hands in a couple of weeks and MVC told me this was the first dual-DVI card they had modified. Most 980 cards have one DVI, one HDMI and one or more DP or MDP sockets.
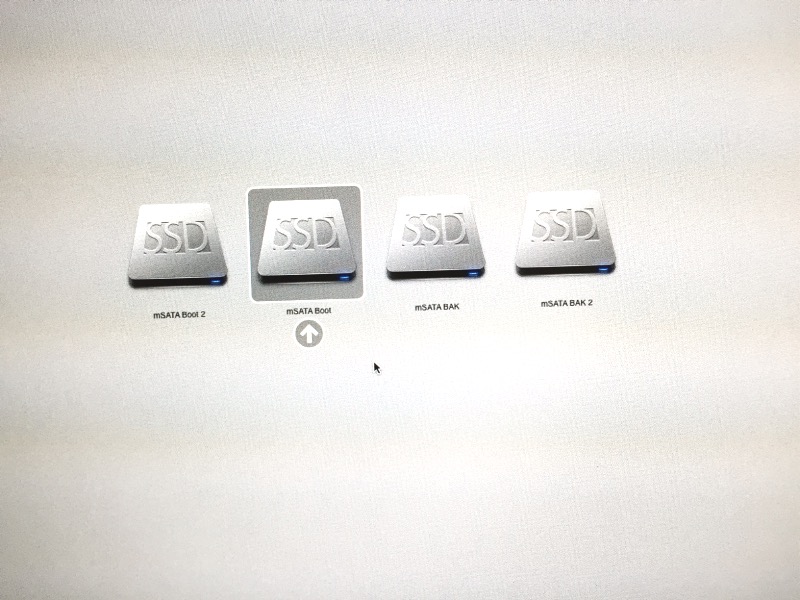

Boot drives using Option-Start in Yosemite with the MVC modified GTX980.

I get proper function on both the DVI-D, DVI-I (both at 2520 x 1600) and DP ports, with the latter limited to 1920 x 1200, as I do not have the required Dell powered adapter. I did not test the HDMI port as I do not have the right cable.

I noted two anomalies – a singe line of code appears for maybe half a second when starting, right before the Apple logo appears. MVC confirms there’s no effect on function and I agree. It’s a cosmetic blip only.

The other is that on cold start, restart or wake from sleep, the card’s fans run up to a noticeable ‘whoosh’ which dies to silence after completion of the boot or wake cycle. Once again, no effect on function, though a change from the stock unmodified card. The speedy fans effect lasts but a few seconds.

Finally, OS X’s System Profiler displays a link speed of 2.5GT/s (PCIe 1.0) whereas I was expecting 5.0GT/s (PCIe 2.0). MVC confirms that the card is actually running at 5.0GT/s, and the only reason for the slower displayed speed is that they have not dug into the code to make System Profiler display the correct speed – the return on effort is not justified, as there is a lot of code to search through. They have a detailed technical blog entry you can read here.
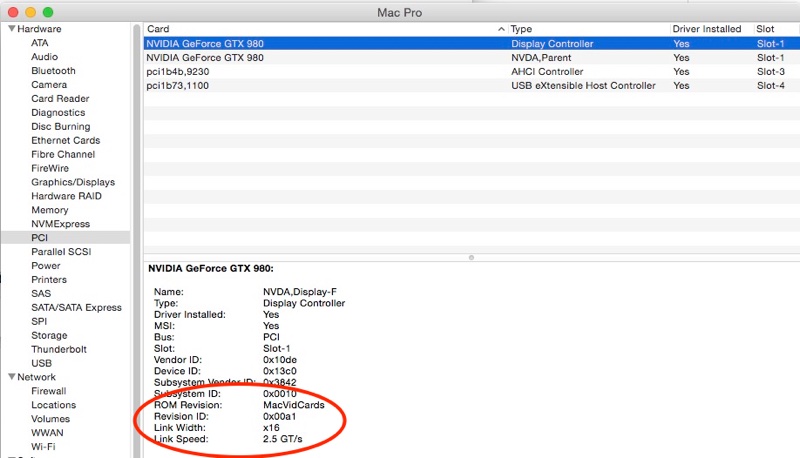

Incorrect link speed shown in System Profiler – the true speed is 5GT/s.

The performance of the 980 with the Apple Cinema Display at maximum resolution of 2560 x 1600 is unchanged – there is no penalty from the upgrade.

Here are the before and after Unigine Valley speeds at the full 2560 x 1600 resolution of the 30″ Apple Cinema Display:
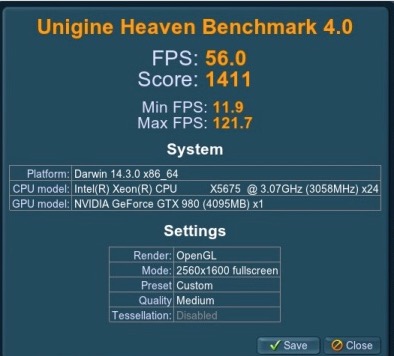
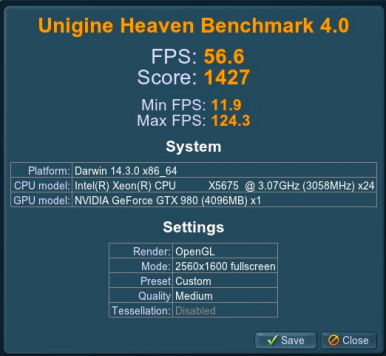
Luxmark shows a small 2% gain to add to the already stellar gain in rendering speed over the GTX680 noted above.
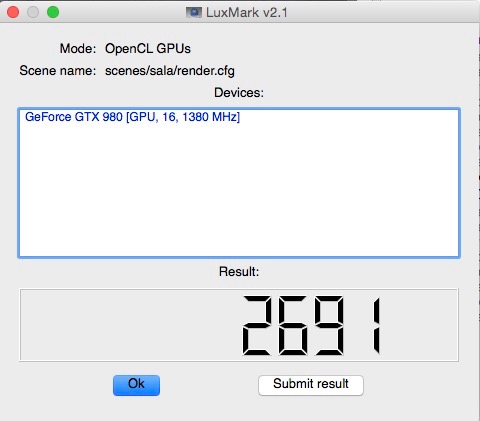
This is a good investment and I recommend the MVC upgrade.

A boot screen for less.

You can buy a used Apple Nvidia GT120 card for $80 and this will show the boot screen. While dated and slow, that’s a lot less than the custom fix above and this old but trusty card has many advantages, including:

  • Takes a single slot only
  • Low power consumption
  • Quiet
  • Requires no auxiliary PCIe power cables, deriving all the modest power it needs from the regular PCIe slot
  • Option-Start will show you all bootable drives in OS X
  • One MDP and one DVI socket – can drive two displays at the same time
  • DVI socket will drive up to 2520 x 1600 displays (tested, functions correctly) using a dual-link DVI cable (such as the Apple 30″ Cinema Display, Dell 30″, etc.) – no powered DVI->MDP adapter required with DVI socket use

The pain is that you have to move your display’s connector to this card to see the boot screen, do your thing, then revert the connection to the GTX980. But it’s $100 saved.

Further workarounds to driver problems:

Click here.
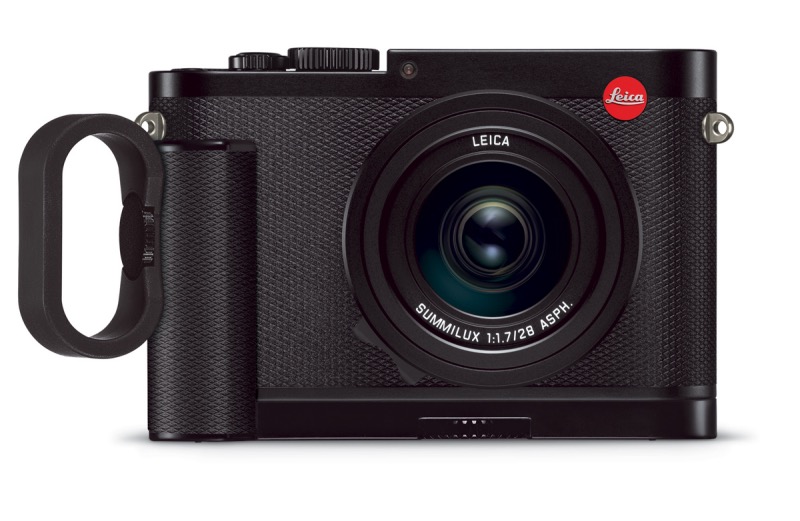
The Leica Q

Leica may finally have done it right.

The Leica ideal was always about street photography. Fast, quiet (well, OK, reasonably quiet), with great lenses and fairly robust bodies. And none of Leica’s digital M film clones has managed to capture the spirit of the M2/3/4 which were the definitive rangefinder film cameras. The digital variants were either silly and deeply flawed, like the M8 with it’s half frame sensor which rendered wide angle lenses useless, not to mention its host of technical issues/random lock-ups/purple casts and so on, or the cameras simply started getting fat. An M9/M240 body is nowhere near as svelte as an M2 and still retains a clunky, bog slow optical rangefinder with manual focus only, not to mention a far from silent shutter. Every time I read some hack going on about how quiet his M’s shutter is I laugh. It’s not remotely quiet, and only a mirrored DSLR user could accuse it of being so.

However, it rather seems as if Leica may have finally got it right with the Leica Q, announced yesterday. Sure, not cheap at $4,250 with a fixed 28mm f/1.7 Summilux lens and not especially small, but it’s full frame, reviews suggest the sensor/software are excellent and it has autofocus. Further, there’s a silent electronic shutter mode, no optical rangefinder to go out of alignment as soon as you look at it and the whole thing rather harkens back to those compact and capable Leica Ms of yore.

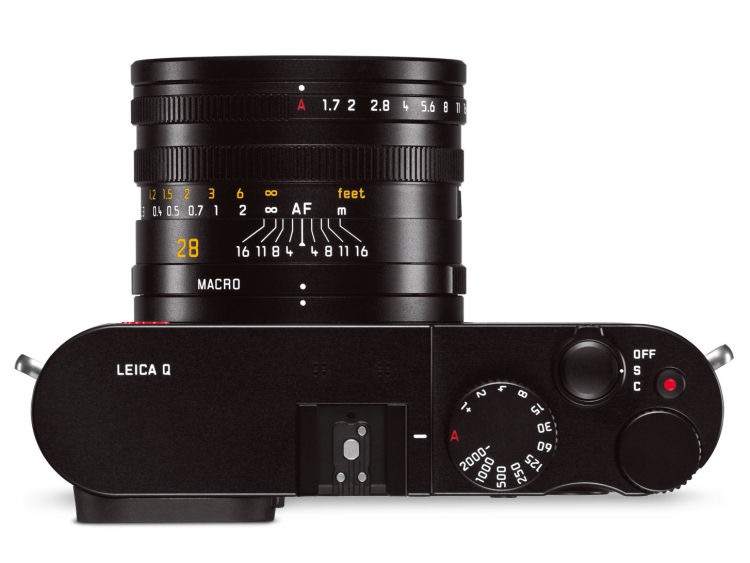
The top plate is surpassingly simple and the street snapper can disregard the movie mode and the LCD rear display. There’s a high quality EVF, finally, and the autofocus is reputed to be snappy and accurate. Why, there’s even wi-fi capability and an iPhone app for remote operation and the like. Leica’s association with Panasonic is beginning to bear fruit.

Automation follows the approach seen in the Panasonic LX100. Turn either the aperture ring to ‘A’ for shutter priority, the shutter dial to ‘A’ for aperture priority or both for program automation. The test shots I have seen from the lens suggests it’s a crackerjack and while it’s not exactly small, the overall price becomes more palatable when you look at what a 28mm Summicron or Summilux for the M runs. There’s a handy macro mode and up to 10 images can be machine-gunned every second for those of the video generation incapable of capturing the decisive moment.

That ‘not exactly small’ lens shows that not even the optical geniuses in Wetzlar can alter the laws of physics. You want a fast aperture and full frame coverage, this is the result and it’s why I am not getting a Q. You get a camera which is not exactly small with an outstanding optic, one that appears to be as good as it gets at any price. For this street snapper the right answer is Panny’s LX100 where you get the same ergonomics and f/1.7 in a far smaller body with one signal advantage. The lens zooms from 24mm to 75mm. Yes, the frame is one quarter the size so there’s more depth of field than you want (PS and the Magic Lasso tool easily fixes that) and at the extreme gargantuan prints from the Q will be easier to make, but the trade offs are all in the wrong direction – bulk and weight. And 4x the sensor size also means 4x the cost. Steal my LX100 and I buy another. Nab my Q and it’s debtors’ gaol. 

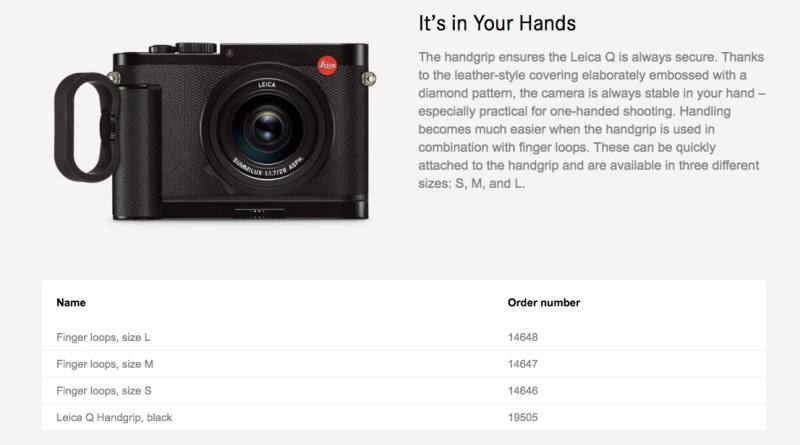
Finger loops come in three sizes and allow the carrying strap to be dispensed with. As for the objectionable ‘look at me’ red dot on the front, a spot of electrician’s tape will put paid to that.

A very exciting development and if the camera lives up to the early reviews Leica is to be congratulated. Now let’s hope they come up with a fixed lens 90mm f/2 variant for an ideal two camera street outfit. Why, like my two GX7s with 35mm and 85mm lenses ….

The factory’s web site is here.

Fan management in the Mac Pro – Part XXIX

Apple’s changes to fan management are a retrograde step.

For an index of all my Mac Pro articles, click here.
I have expressed my frustration at Apple’s seemingly mindless and unending tinkering with OS X before. One of the strangest changes was made in the transition from OS X Mavericks to OS X Yosemite (10.9 to 10.10) and it relates to how the OS manages cooling fan speeds. My findings are based on over a hundred data sets and are statistically significant.

Yosemite vs. Mavericks fan management:

Set forth below are two stress test charts from CPU upgrades I performed on 2009 Dual CPU Mac Pros:


Mavericks stress test.


Yosemite stress test.

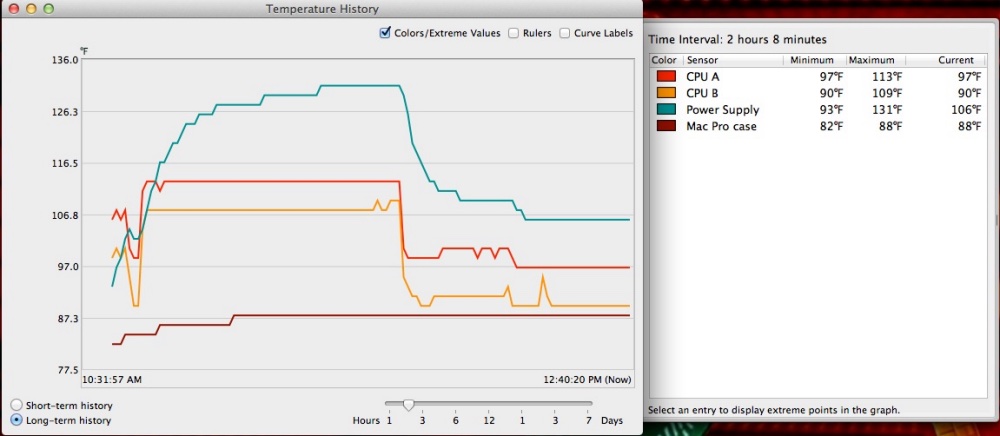
These charts display the temperatures of both CPUs (orange and red) as well as the power supply (green) and ambient temperatures (brown) and are logged over a 70 minute cycle during which a stress test utility loads up the CPUs to near 100%.

As you can see, the temperature chart for Yosemite differs dramatically from that for Mavericks (and indeed for earlier versions of OS X, not shown here).

What Apple has done in Yosemite is to set the OS to ramp up the cooling fans far later in the heat cycle than in Mavericks with the result that CPUs (and other cooled devices) get much warmer before the fans speed up, with the minor benefit that less energy is used at idle. (Of course, thinking holistically, your Mac Pro gets warmer and you have to crank up the air conditioning ….) The result is that everything runs hotter (bad) with the sole benefit being that the fans run slower and hence quieter. Awful engineering. A cool electronic component is a happy electronic component. What was Apple thinking of – an increasingly common question when it comes to OS X?

I have repeated the above measurements dozens and dozens of times on any number and variety of CPUs and the results are always the same. The charts above are neither in error nor do they represent statistical anomalies.

Now during normal, low stress use, this is no big deal. Components at idle rarely exceed 115F with only the hot running Northbridge chip (with an operating ceiling of 220F) running at some 125-140F. That is normal. The NB chip is the main ‘traffic cop’ which parcels computing labor out between the two CPUs and if you are wondering why CPU A always runs warmer than CPU B it’s that it also has additional traffic cop duties, so it works harder. The oft stated ‘fact’ that CPU A’s heatsink gets warm air from CPU B’s fan is nonsense propounded by dabblers who fancy themselves engineers – you will get the same differential with a cold Mac Pro as with a warm one, clearly disclosed in the above charts during the warming stage in the first few minutes of stress.

However, under heavy stress it is not exactly a comfort to see CPUs run up to over 160F before the fans spool up (the service limits are variously between 162F – E5520 2.26GHz 80 watt Nehalem 4-core – to 173F – X5690 3.46GHz 130 watt Westmere 6-core). For the technically inclined I am referring to what Intel calls TCASE, which is the temperature at the top of the Integrated Heat Spreader on the CPU. The actual internal components run a good deal warmer than this but TCASE is what the Mac Pro’s sensors measure, so we are comparing apples with err…. Apples. So while it’s fine in normal use to let the OS manage the fans, I recommend manual intervention when high stress use is contemplated.

Fan control utility:

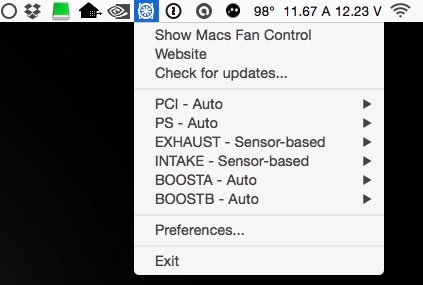
The fan control utility I use to manually override the fans is named Macs Fan Control and it’s a free download, installing itself in the menu bar thus:


Macs Fan Control

Here’s what the fan names refer to:

  • PCI – the large grey fan mounted with two screws on the backplane board which cools the PCIe slot devices (800rpm default)
  • PS – the fan in the 980 watt power supply unit (600rpm)
  • Exhaust – the rearmost grey fan in the processor cage (600rpm)
  • Intake – the frontmost grey fan in the processor cage (600rpm)
  • BOOSTA – the fan on the right side of the processor tray when it is removed, cooling CPU A. The CPU fans are buried in the heatsinks and are ordinarily invisible (800rpm)
  • BOOSTB – the fan for CPU B (800rpm)

Your Mac Pro will also have one or more fans in the graphics card(s). Those are not shown above.

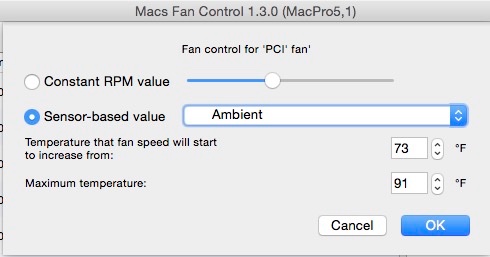
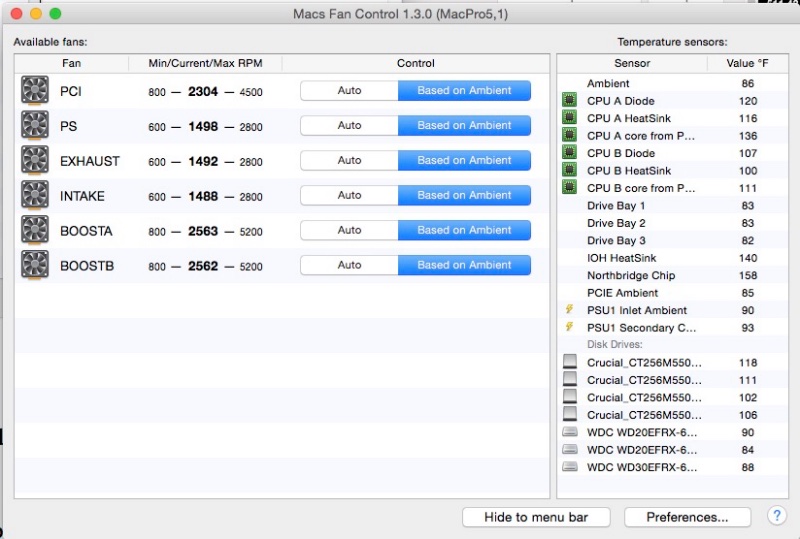
When freshly installed, Macs Fan Control runs all the fans at the factory defaults shown above – or higher if operating temperatures so dictate. If you are using your Mac Pro under heavy stress (typical in movie and advanced audio processing) I recommend that, as a minimum, you switch Macs Fan Control from Auto to Ambient thus:

This will adjust the fans to the ambient temperature inside the Mac Pro’s case (generally warmer than your room temperature) based on the related sensor inside the Mac Pro. As components heat up the ambient temperature inside the case rises and the fans will accelerate.

Your settings will look like this and it takes but a few moments to ‘flip the switch(es)’:

Optimal cooling:noise fan speeds:

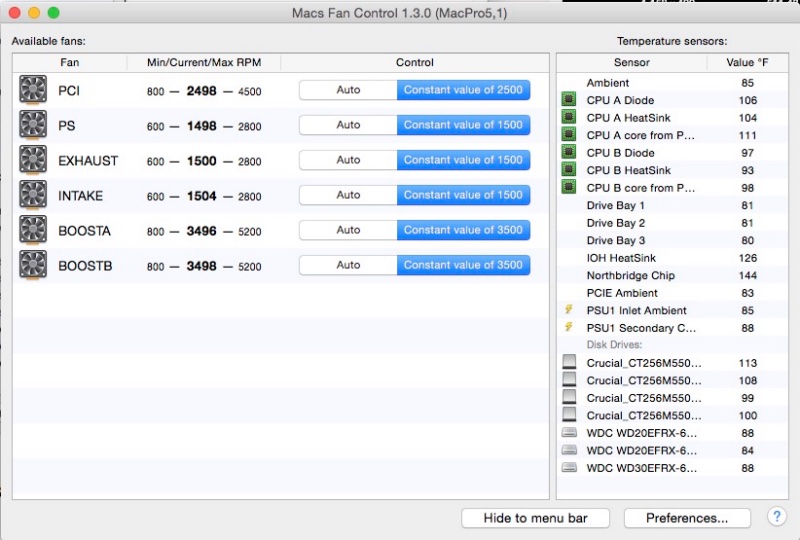
In extremely stressful scenarios, I recommend completely overriding fan automation and setting all the fans to at least the settings below:

  • PCI – set to 2500, which increases noise from 42 to 46 dB (max is 4500 – 57dB, loud at max)
  • PS – set to 1500, 42 to 46dB (max is 2800, 60dB – sounds like a jet engine at max)
  • Exhaust and Intake – set to 1500, 42 to 48dB (max is 2750, 60dB – these really roar at max)
  • BOOSTA and BOOSTB – set to 3500, 43 to 45dB (max is 5200, 47dB – fairly quiet at max as they are buried within their respective heat sinks)

The noise levels above were measured at four feet from the front of the Mac Pro – a common distance for a machine on the floor next to a desk, and the recommended ‘high stress’ settings above are based on the maximum fan speeds consistent with a tolerable noise level. All the fans ramp up noise significantly as they approach the upper end of their working rpm range.

Here are the fans set in accordance with the above recommendations:


Stress settings for all the fans.

With these override settings, the normal 43dB noise level of the Mac Pro (a whisper) rises to 51dB (clearly audible but not intrusive). Fan wear? Fughedaboutit. Fans are dirt cheap. CPUs are not.

A caution on manual fan speed overrides:

If you use manual overrides for fan speeds there is a potential danger that you will be running your fans too low. For example, if your override sets a fan at 2,500 rpm where the system would ordinarily call for a higher speed, the 2,500 rpm override will prevail meaning that your fan will be running slower than the system would elect. To be safe, then, if using manual overrides check your component temperatures during the most stressful period of use and make sure all is in order. If any temperatures are too high, adjust the overrides for the related fan(s) upward.

How loud is the Mac Pro will all the fans maxed out? Intolerably so at 63dB. It’s an unlikely use case, but if it occurs you really want your Mac Pro is a separate room, well distant from your ears.

Mavericks (and earlier OS X) users do not need to interfere as much, as those versions of OS X have a far smarter approach to fan control, ramping up the fans earlier as the above charts disclose. It bears repeating that the best, leanest, meanest version of OS X ever was Snow Leopard 10.6. You can still buy Snow Leopard 10.6 from Apple for $19.99 and then update it online to 10.6.8, the final version. That version will give you access to the App Store and you will have everything a serious user needs. Later versions – Lion, Mountain Lion, Mavericks and Yosemite add little and, as the above discloses, delete common sense in the case of Yosemite.

Yet another case of form (quiet running) trumping function (keep it cool) in the continuning erosion of common sense in the engineering of OS X.

Using mSATA drives in the Mac Pro – Part XXVIII

The classic Mac Pro again challenges the new Mac Pro.

For an index of all my Mac Pro articles, click here.
We did not have to wait too long for the overpriced new Mac Pro to be shown a clean pair of heels by the ‘obsolete’ classic Mac Pro. You know, the machine built to withstand nuclear catastrophe with unbeaten upgradeability. SSD storage, GPUs, CPUs, RAM – you name it.

The nMP’s graphics, limited to the D700 ATI GPUs in the top end (and extremely costly) model use firmware embedded on the chips themselves for Apple. This means that faster aftermarket GPUs cannot be installed to replace the Apple modified ones, and the latest GPUs for the cMP are already faster than the D700s. Rather than go on about it I have installed one of those – a flashed Nvidia Gigabyte GTX980 (with dual DVI ports for my twin 30″ Apple Cinema Displays – no adapters needed this way). Findings, issues and data are here.

My CPU upgrade service – click the logo above – already provides Intel CPU upgrades for the cMP which easily match the performance of the costliest CPU available for the nMP.

Maximum RAM in the nMP is 64GB. Many of my cMP upgrade customers are happily running 128GB in their 12-core Mac Pros.

Now it’s time for the nMP to be shown the ropes in the SSD storage arena. The most SSD storage you can order in your $9,000 top-of-the-line nMP is 1TB of flash storage. Thereafter it’s external Thunderbolt drives and costly enclosures for nMP owners. Until now I have been recommending the Apricorn Duo PCIe card with two 2.5″ SSDs installed (so up to 2TB of storage) in the cMP. Set up using Disk Utility in RAID0 this installation provides near Thunderbolt speeds at an attractive price – $150 for the Apricorn Duo plus SSDs of choice. The card uses regular SSDs. mSATA SSDs make regular SSDs look positively huge.

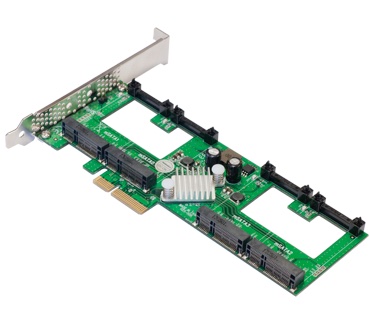
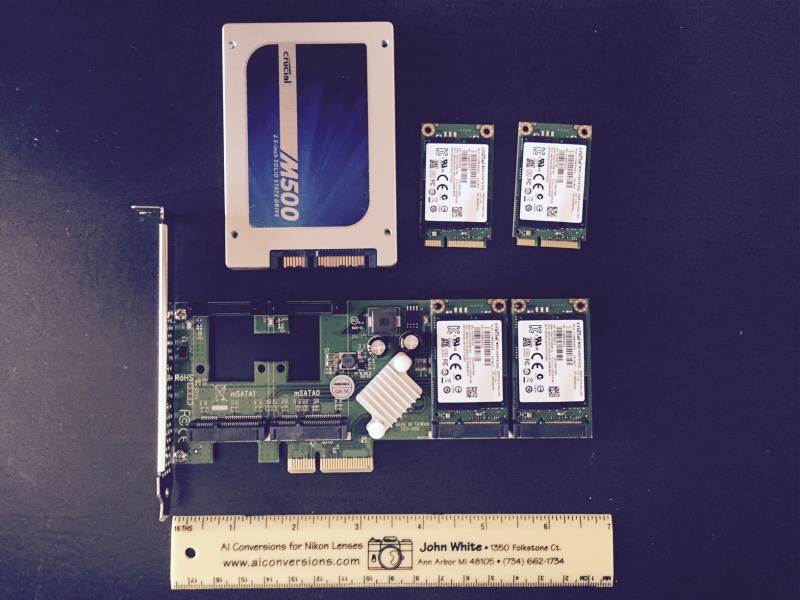
However, Addonics has announced a four bay PCIe card which will accommodate up to 4 mSATA SSDs using just one PCIe slot and here’s the best bit: it costs just $55! mSATA mini-PCIe SSDs cost 10% more than the regular SSDs used in the Apricorn but given that two Apricorn Duos would cost $300, the net cost for like capacity is a good deal less using the Addonics card. (The even faster Samsung/Apple long ‘blade’ type SSDs deliver a reported 1400 mb/s, but cost $700+ for a 1TB stick and are limited to one stick per PCIe slot – those are not addressed here).


The Addonics Quad mSATA PCIe card.

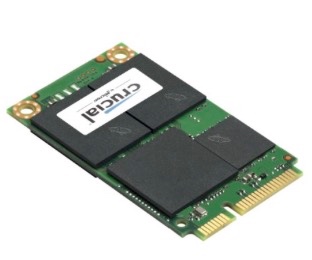
I have ordered one card ($66.41 shipped to CA) and four of these from Amazon at a cost of $423.80. My total cost for the card and four mSATA SSDs was $490.21:


Crucial 256GB mSATA blade SSD.

For those interested, the flash chips in Crucial’s mSATA cards are made by Micron.

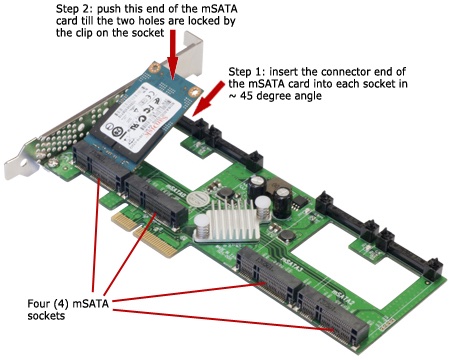
Here’s an mSATA drive being installed:

The flexibility is great here, and note that 4 x 250GB in RAID0 will be faster than 1 x 1TB unRAIDed.

The beauty of this approach is also that the Addonics card will only take up one PCIe slot and as cMP users know, PCIe slots are rare as hens’ teeth in these great machines. Slot #1, the double width one, is dedicated to the GPU, leaving just three slots. One of those is used by an USB3 card, so things are getting a bit slim, especially is you use sound processing cards.

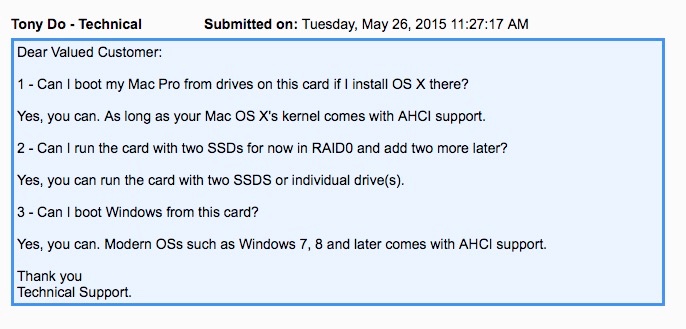
Before committing to purchase I took the precaution of asking Addonics some questions – those, with their techie’s response, appear below:

For the benefit of those who do not speak geek, ‘AHCI support’ is geek for ‘any version of OS X or any Windows Vista or later’. So that’s great. You can use the Addonics with just one drive, adding more later and you can boot OS X from it. What you do with Windows on it is of zero interest to this writer.

Installation:

Installation of the mSATA SSDs in the Addonics card is, literally, a snap. After inserting the card in the connector, it is snapped down onto two retaining posts. The miniscule retaining screws provided are mercifully unnecessary. (Update: Addonics has gone backwards in it’s latest variation of this card – the one now linked – and requires the use of the miniscule screws provided to retain the mSata card. Use a magnetized screwdriver if you want to retain your sanity).


Traditional 2.5″ SSD for comparison – 2 of the mSATA drives are installed here.

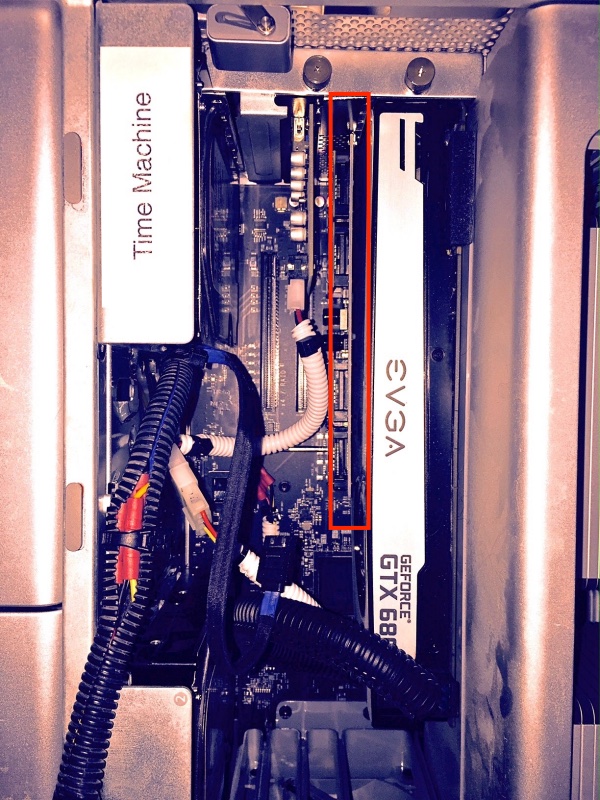
Inside the Mac Pro the Addonics card is notable for its slim profile, which helps in keeping the airflow to the graphics card on the right optimized:


The Addonics is in the red rectangle. The card is short and does not interfere with the PCIe fan.

RAID0:

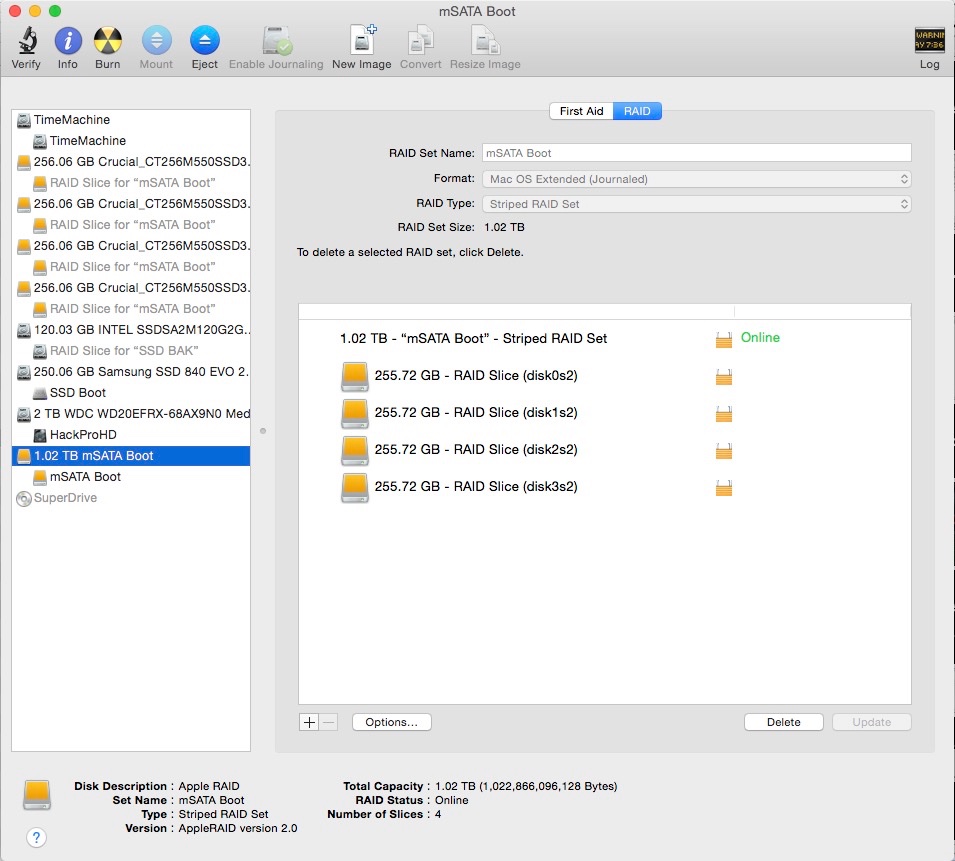
Disk Utility is used to set up the striped RAID0 sets:


2 striped disks seen as one 512GB drive.


4 striped disks seen as one 1TB drive.


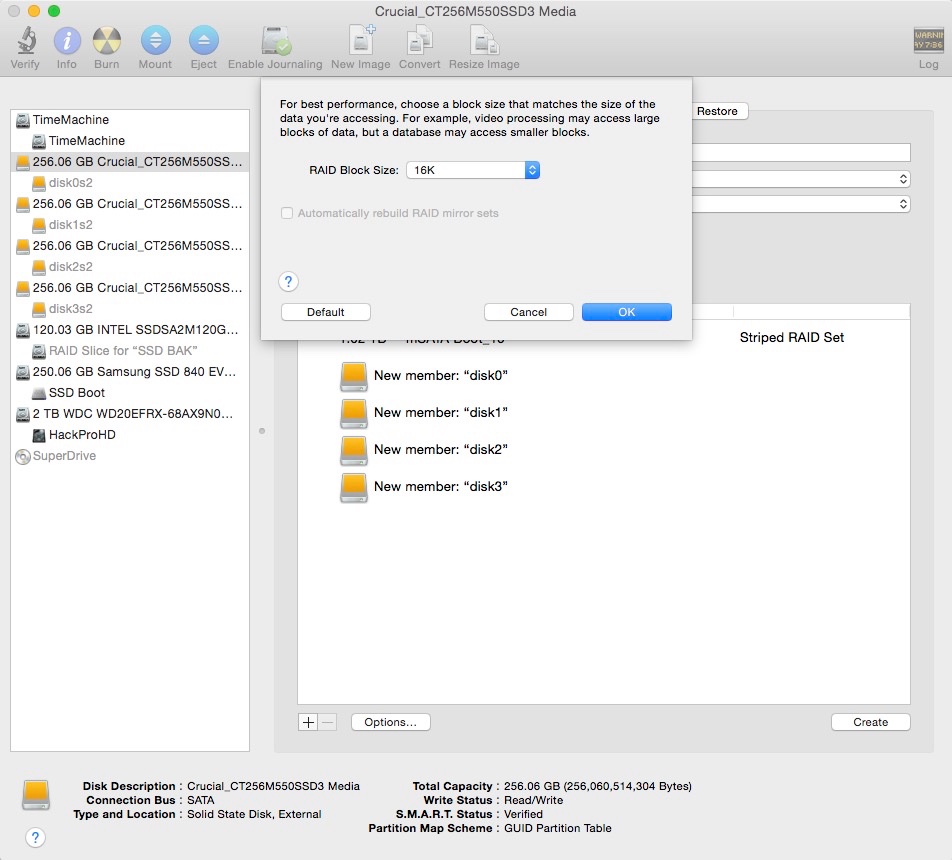
How to vary stripe sizes – the narrative is clear.

Should I use TRIM?

These SSDs do not support TRIM as shipped but tools like TrimEnabler can add it. I used to install TE on my 2.5″ SSDs without much thought, which is wrong.

TRIM, which performs garbage management, is slavishly adopted by many to cure what ails SSDs, though finding analytical writing on the benefits of TRIM is much harder than just jumping to the conclusion that it’s required.

One interesting site frequented by industrial users and database administrators suggests there are more problems with TRIM than there are benefits so I have opted to not install TRIM for these mSATA SSDs. Much more hard data is needed here.

Further, in a year or two I expect that 2 and 4TB SSDs will be selling for what 0.5TB and 1TB ones are today, and I very much doubt I will have stressed the disks’ garbage sectors when it comes time to upgrade.

Boot speed:

My Mac Pro variously has 48 or 64GB of memory installed (6 or 8 sticks). That is germane to boot times as all that RAM has to be checked by the OS as part of the start-up cycle – the more memory, the more time. My machine takes maybe 20 seconds from power-on to the start-up chime and another 15-20 seconds (dual 3.06GHz CPUS) from the chime to the login screen. If yours is taking much longer, I recommend doing both SMC and PRAM resets.

Test data:

In practice, DiskSpeedTest speeds are very high and the other advantages of the Addonics – slim factor promoting ventilation, only one PCIe slot used for two RAID0 drives, ease of installation – are icing on the cake; further, I have increased the space available for scratch disks, after duly repointing Photoshop to the new mSATA RAID0 striped pair, as well as freeing up drive slots elsewhere inside the Mac Pro’s chassis:


Two drives in striped RAID0 with Stripe=32


Four drives in striped RAID0 with Stripe=16.


Four drives in RAID0 with Stripe=16

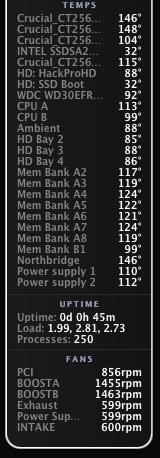
The temperatures below were measured during a clone of the OS and apps from my former boot drive. The first two hot mSATA drives are the ones being written to by CarbonCopyCloner, the other two are dormant. The latter will become a RAID0 striped pair to backup to OS and apps. All these readings are very conservative


mSATA drive temperatures.

Technical note:

The Addonics Quad mSATA PCIe card uses the Marvell 88SE9230 chipset which is limited to PCIe two lane speeds and thus maxes out at a 700mb/s transfer speed. One day maybe someone will make a four lane cards and we should see closer to 1400 mb/s.

Booting and partial slot use:

I confirm that Addonics’ responses, above, are correct. Once I had used CCC to clone over my OS and apps, I set the new mSATA RAID0 drive up as the Start-up Disk in System Preferences, and the Mac Pro restarted from it first time. After now many dozens of boots (July, 2015) I have never experienced a refusal to boot.

I also confirm that not all the four slots on the Addonics card have to be populated. The card was happily recognized by OS X Yosemite 10.10.3 with either two or four mSATA drives installed. I did not test with one or three, but as Disk Utility discloses four individual drives, that should not be a problem.

Smart Reporter:

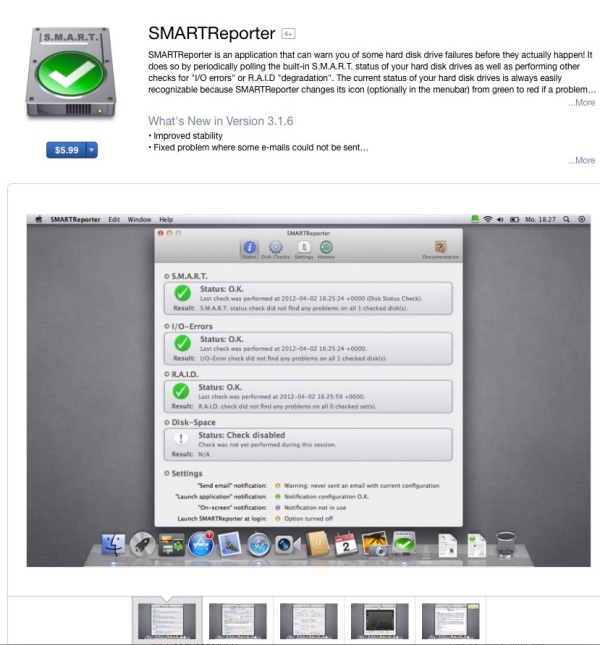
This useful utility, which keeps an eye on the health of your disk drives, needs updating at the AppStore, for all of $6, to monitor the health of your mSata drives:


Version 3.6.1 of DiskReporter.

After the Addonics upgrade:

Here’s my desktop now – two mSATA SSDs (comprised of two paired RAID0 SSDs each), a large HDD data drive (the legacy name dates from my Hackintosh days!) with a like backup and a TimeMachine versioned HDD:

If you change drive names, be sure to change your settings in CarbonCopyCloner and/or CrashPlan or your backups will fail.